Meat Lover’s Pizza Dip

So, I heard there’s a big football game coming up pretty soon. And y’all know me, any excuse to make & eat party food. This pizza dip would be great for a Super Bowl party (or any party), for after school snacking, or you can go crazy and eat it for dinner (which is exactly what my husband did one night recently.) It can be a low-carb alternative to traditional pizza, depending on what you eat it with.

Meat Lovers Pizza Dip

You can also add whatever pizza toppings you like. I made this a ‘Meat Lover’s’ version, full of (turkey) pepperoni, seasoned ground beef, and bacon. Sausage and Canadian Bacon would have been good too.

Meatza Pizza Dip

This is a cheesy, creamy dip, that is good with tortilla chips, corn chips, pita chips, toasted French bread, bread sticks, and the list goes on. I wasn’t a big fan of the pretzels used in the above pic however. They turned a little soft & I didn’t like the texture. Of course, the dip is also good eaten with a spoon!

Pizza Dip

I used: 

1 lb ground turkey sausage

1 jar No sugar added Ragu Light Spaghetti Sauce (with lots of added oregano!) – feel free to use your favorite pizza or pasta sauce

 1 cup shredded cheddar cheese

2 cups shredded mozzarella cheese

1/2 cup shredded parmesan cheese

turkey pepperoni – to taste

1/2 small diced onion

**These cheese quantities are estimates.  My crowd likes LOTS of cheese, so you can adjust it to suit your fancy.  I mean taste buds.  You can also add mushrooms, peppers, whatever your family likes on a pizza.  I’ve also made this with eggs mixed in with the meat to form a ‘base’ …more like a traditional pizza. However, since Mr. Three is allergic to eggs, I can’t do that anymore.

DIRECTIONS:

Cook your ground turkey and onion together, drain if needed.  Place a little sauce on the bottom of your casserole dish (I used a 9×13), dump your turkey/onion on top, add the rest of your sauce, top with cheese, place pepperoni on top.  Bake until golden brown and bubbly.

Recipe adapted from  and my Pizza Casserole

As you can see, the amounts and ingredients are very versatile. Anything you like on pizza will probably work well in this dip. Feel free to add more or less meat, cheese, and spices.

Will you be watching the Super Bowl? Thought about what food you will be serving? That is the most important part, right?
I may be linking up at any of the following – (Monday) , , ,  (Tuesday) ,, ,  (Wednesday) , , ,  (Thursday) , ,  (Friday) , , , ,, , , ,  (Sunday)

Vanilla Pound Cake with Cinnamon-Vanilla Cream Glaze

I know it’s taboo to post sugar the first week of the new year, with everyone on the diet train and all, but since it’s the SECOND week in January…I think we all deserve a treat for making it this far. Am I right, or am I right?! First, I have to admit that I’m am so not a vanilla person. I will choose chocolate every time. Or maybe lemon. But never vanilla. However, my daughter had a friend over recently and it was the little girl’s birthday. Me, being the awesome mom that I am (so says I), offered to bake a cake. The girl requested vanilla. I was like “huh?” She said she didn’t like chocolate. So I made her leave. Just kidding…but seriously?

Vanilla Cake with Glaze

Well, I may just be a vanilla convert. I never knew the quality of the vanilla would make such a difference. I mean, you usually only add a teaspoon or so to baked goods, so what’s the big deal right?

Nielsen Massey Mexican Vanilla

It makes a difference. Trust me! I was sent some Mexican Vanilla to sample and used it in this cake…it was so good! Granted, the predominant flavor of this cake, is in fact, vanilla. So it would make sense that a good quality extract would up the yumminess factor.

vanilla pound cake without glaze

The cake itself is lighter than a traditional pound cake, but still nicely dense. It has a good flavor and would be excellent with a chocolate ganache, lemon glaze, or pretty much anything you want to top it with. It’s even good plain!

Vanilla Pound Cake Pin

I decided I would go all-out vanilla, and added vanilla cream glaze, with a little cinnamon.

[amd-zlrecipe-recipe:11]

Recipe Source:

So what are you…a chocolate or vanilla person? Or lemon, or strawberry….we can still be friends.

I was provided a sample of the Nielsen Massey vanilla mentioned in the post but was not compensated nor obligated to right about them. All thoughts expressed are my own. 

This Vanilla Pound Cake was featured at the Party, , and chosen as a host favorite at !


I may be linking up at any of the following – (Monday) , , ,  (Tuesday) , ,, ,  (Wednesday) , , ,  (Thursday) , ,  (Friday) , , , ,, , , ,  (Sunday)

Creamy Hoisin Egg Roll Dipping Sauce

This post was sponsored by MINH® Mini Chicken Egg Rolls and I was compensated to write it. Regardless, what I have written reflects my own opinion and experience. I hope you find it useful.

The holidays are in full swing, and with that brings social gatherings. And obviously you can’t have a get together without lots of good eats…otherwise it’s just a meeting. (Ok, so I’m sort of paraphrasing Julia Child, but she definitely had a point.) I love party food (aka appetizers, appies, finger foods, or hors d’oeuvres <– hardest word ever to spell)

Egg rolls w sauce collage_Fotor

Sometimes we have hors d’oeuvre night where we just have a bunch of party food for dinner. My kids love that (for obvious reasons.) It’s mainly for “special occasions”. Anyway, as much as I love making everything from scratch, like homemade egg rolls, I often just don’t. have. time. So, I was thrilled to find these  at Sam’s Club.

Minh at Sams

They are affordable, you get a bunch in a box, and most important – they are delish!

egg rolls labeled photo

They are the perfect size to serve at a party too. They bake in the oven in under 15 minutes, and come with a tasty sweet chili sauce.

party egg rolls

I’ve sprinkled this platter with dried cilantro and red pepper flakes (green & red!) but it could be easily omitted, or just added to the sauces. You could also use basil I think, but I would not recommend oregano (personal opinion).

Egg Rolls

Along with the sweet chili sauce, I wanted a white sauce (I almost made it green with the addition of green dragon sauce, but I wasn’t sure if it would look appetizing.) This is a mild, creamy, slightly sweet sauce that pairs well with the egg rolls and perfect for those who have a low heat tolerance (everyone in my house except me!), but you can easily spice it up by increasing the chili paste or adding red pepper flakes.

[amd-zlrecipe-recipe:9]


In addition to mini egg rolls, my other “go-to” party foods are sausage balls (these are a must at Christmas and New Year’s!), Creamy Sausage Dip, Chips with restaurant style salsa, chips and dip, cheese and crackers, and at Christmas, there will be fudge on the dessert table, along with these…022

Pretzel Treats…my kids LOVE these. Obviously, we don’t usually have fancy parties. We have family, kid-friendly parties! What’s your favorite party food?

Football Party Food

I’m the first to admit that I know nothing about football. However, I’m all about some party food. Even though I will not be having a party…it’s a school night, ya know…I will be fixing up some yummy snacks so we can gather around the TV and watch the Super Bowl (mainly the commercials and .) So, if anyone is still working on their menu, here are a few ideas –

 
Queso Dip {2-ingredients}
Meatball Sliders (also see 3-Ingredient Meatballs made in the crockpot)
Pork BBQ {Crockpot}
Pizza Puffs (these are good at room temp too)
And *some* of you may be interested in this bright GREEN punch….
Obviously, minus the rubber duckies 😉
And for that sweet tooth
~or~
For my low carb or diabetic friends…
So, is football your thing? Will you be watching or grazing the food table like me?

Queso Dip { 2 ingredients!} #QuesoForAll #sponsored

This post brought to you by . The content and opinions expressed below are that of Makin’ it Mo’Betta.

Two ingredients? I’m in. I love quick and easy, and when it tastes good AND a majority of my house will eat…it’s a total win.

Therefore, Queso Dip made with RO*TEL and VELVEETA was a winner in my house! This would be great for “the big game” (don’t ask me to talk football, but I can talk football food all day long) or any social gathering. I made it recently for my daughter’s birthday party.

I blend my RO*TEL with an immersion blender so that the dip is smooth…because my kids will not eat chunks of tomato *insert eye roll*.

Either way it’s flavorful, creamy, and spicy (but not too spicy!). 

Queso Dip 

(from the back of the RO*TEL can)

  • 16 ounces VELVEETA
  • 1 (10 ounce) can RO*TEL (you could use Mild, Original, or Hot)

Melt VELVEETA in a sauce pan over medium heat with can of undrained RO*TEL until cheese is melted and sauce is heated through. Use immersion blender to blend until smooth if desired. (You could also run the tomatoes through a regular blender and then add to cheese.) 

Queso Dip is awesome served with tortilla chips, but we also enjoyed it over nachos.

Pile tortilla chips with Queso Dip and whatever else you like!

YUMGet more Queso recipe ideas at , as well as,  and .

What’s on your Super Bowl menu? Inquiring minds want to know!

Baked Shrimp Won Ton Cups & other (healthier) Appies! {#Nasoya #Sponsored}

This post is sponsored by Nasoya. All opinions are 100% my own.

Well, somehow Christmas is OVER. As I say every year, I have no idea how it came and went so fast. It doesn’t matter that I started listening to Christmas music in November and *gasp* had my tree up BEFORE Thanksgiving. Yep, I sure did…doesn’t matter however, because Christmas still came and went too fast.

Oh yeah, and 4 weeks before Christmas…Number One got sick. Three weeks before Christmas, Mr. Three got sick. Two weeks before Christmas, Miss Two got sick. And guess what happened ONE week before Christmas? You guessed it…mama got sick. So, that is why my last blog post was December 16. *insert sad face* I have all this cool Christmas stuff to share too…and who wants to read about that now? It’s New Year’s Eve. Party time! Then it’s ohmigahhh….resolution time. Time to give up everything we indulged in over the past month. *insert crying sad face*.

Luckily, I have something that will make the transition from indulgent eating to healthy eating virtually painless. It’s also party ready, fun, cute, portioned controlled, low fat. low in Weight Watchers points…no, I’m not talking about air. These actually taste great and are portable! Great for New Year’s, football, appetizers, or if you are like me, can make a meal out of them. They are Baked Shrimp WonTon Cups. They are quick and easy to prepare too. You can make the filling with whatever veggies and quantities you like. I’m just going to give what I use, and you can play with the recipe to make them your own.

Baked Shrimp Won Ton Cups

Filling:
1 bag Cole Slaw Mix (or you can shred your own cabbage and carrots)
3-4 green onions, chopped (I usually use whatever onion I have on hand, green/red/yellow)
1/4 – 1/2 cup celery, finely chopped (just depends on how much you like celery!)
1-2 cloves of garlic, minced
1 bag frozen small shrimp, thawed and cut in half or thirds (can also use chicken/beef/pork)
2 Tablespoons soy sauce (I prefer tamari)
1/2-1 tablespoon hoisin sauce (Hoisin is strong and sweet. I use it if I have it, but it’s not mandatory)
salt and pepper, (to taste)
1 tablespoon olive oil


  • Preheat oven to 375 degrees.
  • Place won tons in a mini muffin pan, one won ton per muffin cup. (Just push them down in the cup, there will be some overlapping). Set aside.
  • In a skillet over medium heat, heat tablespoon of olive oil. Add onions and celery. Heat until onions begin to soften. Add garlic, heat a minute or two until fragrant.
  • Add bag of cole slaw mix, soy sauce, hoisin sauce and salt and pepper. Carefully stir (my skillet is always very full until cabbage begins to wilt.)
  • Add thawed shrimp, stir frequently until shrimp is pink. Once shrimp is done and cabbage is softened, remove from heat.
  • Place a tablespoon of mixture into the won ton cup. Bake won tons approximately 5-7 minutes, until lightly browned and crisp.
  • Remove cups from oven and place on serving tray. Top with cilantro and drizzle with Ponzu Sauce if desired.

*Feel free to add any veggies and seasonings you like. My only recommendation is watch the amount of liquid produced (some veggies leach a lot of water out). You want as little liquid as possible in your wrappers because it will cause them to fall apart.

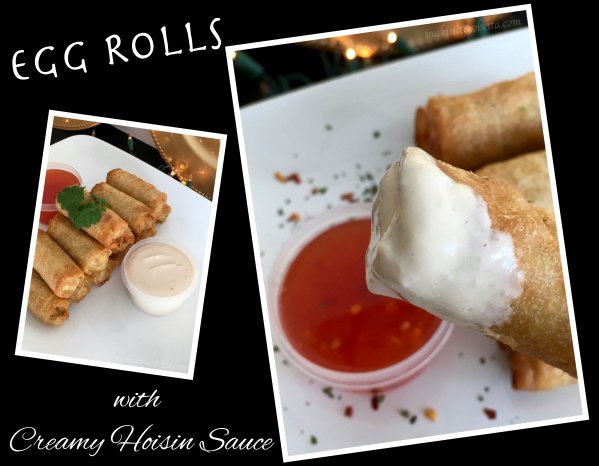
This is the same filling I use for egg rolls too. I love baked egg rolls, which is odd, because I do not like fried egg rolls, and we all know everything is usually better fried. To make the baked egg rolls, use the same filling, put a few tablespoons of filling in an (fold them better than I do!), place on a baking sheet, spray both sides with olive oil or cooking spray. Bake about 10 minutes per side. They are healthy and delicious!

My kids love these Baked Mozzarella Sticks. They are so easy, as it is just a mozzarella cheese stick (“string” cheese) wrapped in an egg roll wrapper and baked. Spraying both sides with olive oil or cooking spray just like with the egg rolls. They can be dipped in marinara or pizza sauce too.

Since my kids love Baked Cheese Sticks, I knew they would like Baked Cheese Cups too. I was right! Just add cheese to your won ton cups and bake until the cheese is melted and won tons are brown and crisp. You could serve these along side a sauce as well. So much healthier than frying and I love the little cups for a party or as an appetizer. You could add anything really…any dip can be placed in a won ton cup and suddenly becomes portable! Tonight I am making Buffalo Chicken Dip in won ton cups…it will make it so easy to eat! You can also bake the shells then add things like chicken salad or pimento cheese…the possibilities are endless. It makes me want to put pretty much everything in a won ton cup. What can I say, I love party food.

Happy New Year’s Eve as my little one said first thing this morning! I’d love to hear what’s on your menu for tonight. Or tomorrow…I haven’t fully decided what I’m cooking for New Year’s Day yet…but I’m pretty sure it won’t be black eyed peas!

I may be linking up at any of the following – (Monday)  (Tuesday) , ,, (Wednesday) , (Thursday) , (Friday) ,,(Saturday) 

3 ingredient Meatballs & other time-saving Holiday Hacks (#sponsored)

This is a sponsored post written by me on behalf of . All opinions are 100% mine.

The Christmas countdown is ON in the Mo’Betta house! I have a 6 year old that is literally counting down the days, and his excitement is contagious. (Let’s just hope the cold he had last week is not. ‘Tis the season.) I’m sure we all have some favorite recipes for the holidays, some being more labor intensive than others (can you say old-fashioned fudge?!), but we all need a few quick and easy ones lined up that will feed a crowd, yet be delicious. I thought I would share a few that have served me well over the years. These little ‘holiday hacks’ get me out of the kitchen, and able to spend more time with my friends and family.

These 3-ingredient meatballs have been around for years. They make an appearance around the holidays, as well as baby showers, bridal showers, you name it. I got the recipe from one of my uncles many years ago, and I’m surprised it has not made the blog before now. The ingredient list seems a little odd, but it works! I always have people asking for the recipe…and it’s SO easy! 

3-ingredient Meatballs

  1. 2 lbs. frozen meatballs
  2. 1 bottle (12 ounces) chili sauce 
  3. 1 bottle (12-15 ounces) grape jelly

*These can be prepared on the stove top, or in a slow cooker. The slow cooker is also great for keeping them warm during a party or get-together. Amounts can also be adjusted based on the number of people you are feeding. 

Add meatballs to crock-pot aka slow cooker. Mix together the chili sauce and grape jelly, then pour over meatballs. Heat through on high for 3-4 hours, stirring occasionally, then turn heat to low or ‘warm’ setting for serving.

I’ve seen many variations of this recipe so feel free to play with it…you can use barbecue sauce in the place of chili sauce; you can use cranberry sauce in the place of grape jelly; you can use turkey meatballs instead of beef, which I do often.  makes original and turkey meatballs that are also gluten free. They look like this:

but you can use the  to find them near you. Before heading out, I would go  coupon! Another quick and easy meal is to heat up your meatballs, and add them to slider buns with a little pizza sauce and mozzarella cheese. Stick them in the oven to melt the cheese…

In addition to frozen meatballs, you can save yourself a lot of time by stocking the freezer with other snacks that can easily be heated and served like Farm Rich Mozzarella Sticks, Loaded Potato Skins, Pepperoni Pizzeria Bites, Toasted Ravioli, and Breaded Mushrooms. My girls and I LOVE Loaded Potato Skins. Top with a little sour cream (or plain yogurt) and green onion and you are good to go. 

Sausage Balls are another family favorite, and to save time, I mix up a batch early in the season, roll into balls, and freeze. Then when company comes or we want sausage balls, I can pop them in the oven straight from the freezer. 

What about a breakfast timesaver?

These Oven Baked Pancakes can serve a crowd quickly with all the great comforting taste of pancakes, without all the standing and flipping over a griddle. Or this Make Ahead Breakfast Casserole that can be made up the night before and just baked when ready in the morning.

And of course, if you know me, you know that I will definitely have plenty of sweets…our favorites being a sweet and salty combo…

This Chocolate Lover’s Snack Mix can be whipped up fast and easy, using basically whatever is in your pantry. Also, these little gems…

These easy Turtle treats can be made in minutes. 

So, these are a few of my ‘Holiday Hacks’…feel free to share yours!

You can find more recipe ideas by following Farm Rich on . (They are also on , , and )

White Chocolate Popcorn {Party Favors}

Having your guests have a little something to take home at the end of a party is a fun thing to do. I, of course, like for it to be something edible. Everyone likes food right? If they are friends with me, the answer to that is yes. Because seriously, who wants to hang out with someone who doesn’t like to eat? Don’t answer that. You people out there who just “forget to eat”…I have issues with you. I’m kidding. Sort of. 

For my sister’s baby shower, I made white chocolate popcorn with pink, green, and white M&M candies.
It looked cute bagged up, and it tastes good. We placed a framed sign on the table with the favors that said ‘Ready to pop’. My cousin made it and it was very cute (it was also done in pink and green), but somehow I didn’t get a picture. That’s the downside to hosting a party, it’s hard to get as many pics!
The popcorn was tied with pink and white curling ribbon and I found little strollers, pacifiers and baby blocks at a dollar store (The Dollar Tree), so we tied those to each bag. It’s similar to the Birthday Cake Batter Popcorn party favors I did for my daughter’s 10th bday party.

White Chocolate Candy Popcorn

*The amounts are going to vary depending on how much you want to make. We made 25 favor bags, and I am guessing it was about 2 cups per bag, maybe a little more. The recipe is for one ‘batch’ and I doubled it.
 
12 cups popped popcorn (1/2 cup unpopped kernels)
1 (24 oz) package of white almond bark or white chocolate chips, melted
*sea salt (optional)
desired candy or sprinkles
  • In a large bowl, pour the melted chocolate or almond bark over the prepared popcorn.
  • Stir to mix.
  • Spread chocolate covered popcorn out on wax paper.
  • *Sprinkle with sea salt if desired (this is not needed if using salted microwave popcorn. I used plain popcorn from my air popper) You can also skip the salt all together, but I like the sweet-salty combo.
  • Add candy to popcorn BEFORE CHOCOLATE HARDENS. Lightly press candy down onto the popcorn. (You can mix the candy in with the chocolate, but then it gets covered in white chocolate so it’s not as pretty. I like to add it on the tops, you just have to work quickly before the chocolate hardens.)
  • Once chocolate/bark is set, break apart and place in bags.
This simple recipe can be adapted to pretty much any party or theme. Just change up the candy used, add sprinkles, etc. I don’t recommend making it more than 24 hours in advance because the chocolate coating causes the popcorn to get soft…it’s still good however!
If looking for a good party punch, you can check out this post.
If looking for more baby shower ideas, you can check out my .
I may be linking up at any of the following – (Monday)  (Tuesday) , ,,, (Wednesday) , (Thursday) , (Friday) ,,(Saturday) 

Delicious 5-Minute Chocolate Frosting

Over the years I’ve tried several different variations of frosting. Most are the same basic ingredients with slightly different sugar to cocoa ratios and varying amounts of added liquid (some call for milk, some cream, etc.). Finally, I think I’ve found THE one. This will be my quick and easy go-to recipe from now on because of its great chocolate flavor and super creamy, easy, spreadable consistency.

I love that it whips up in just a few minutes, with just a few ingredients.
And it’s creamy and spreadable..but not so soft that it slides right off!
You can take 5 minutes to whip this up with butter, sugar, vanilla, cocoa and milk or you can buy the canned version with palm oil, high maltose corn syrup, distilled monoglycerides, polysorbate 60, and the list goes on.
The key to a great frosting is not only the texture/consistency, but even more important…the flavor! The amount of desired chocolate flavor is going to vary from person to person. I love dark chocolate, but some of my family prefers milk chocolate.  For us, I found the perfect compromise by combining regular and dark cocoa powder.

5 Minute Chocolate Frosting

1 cup butter, softened
1 Tablespoon vanilla extract
1 cup cocoa (I used 3/4 cup regular Hershey’s cocoa and 1/4 cup Hershey’s Dark)
4 cups powdered sugar
1/3 cup half and half (mine was fat free, can also use milk of choice)
  • In a large mixing bowl, add softened butter and vanilla. Mix until creamy.
  • Add cocoa. Mix until blended.
  • Add 2 cups powdered sugar and half of the creamer (or milk). Slowly mix together (to prevent having sugar all over your entire kitchen!) Mixture is going to get thick.
  • Add remaining 2 cups powdered sugar and remaining milk. Stir until well blended and creamy.
If frosting is not at desired consistency: 
-too thick? add small amounts of milk until desired consistency is reached
-too thin? add small amounts of powdered sugar or cocoa until desired consistency is reached
Recipe adapted from
NOTE: I made a double batch to frost this 4 layer cake, however, I had a lot leftover. It freezes great! Place leftover frosting in a sealed container in the freezer, when ready to use again allow to thaw and then mix well to “fluff” it up again!
My son was very specific on what kind of birthday cake he wanted for his 6th birthday. He wanted four layers, chocolate cake, chocolate icing, with M&M’s and Kit Kats on top! He also picked out his Lego candles. Nothing fickle about this kid…he knows exactly what he wants! What can I say…my boy has his mama’s heart and generally gets what he wants!
I may be linking up at any of the following – (Monday)  (Tuesday) , ,,, (Wednesday) , (Thursday) , (Friday) ,,(Saturday) 

White Chocolate Lemon Oreo Truffles

So…obviously I’m having a hard time in the ‘blogging regularly’ department. I’ll tell ya, when I was blogging everyday, I got fat. All that cooking, eating, and sitting was not a good combo. I’m still cooking and eating, but instead of using my free time here, it’s been at the gym. Much better for my waistline, not so great for this here blog. I hope you all will bear with me as I try to get a routine going again.

Anywho, in other news….I’ve been going through an Oreo ‘phase’. Specifically, an Oreo Truffle phase. It’s madness. My thighs seriously hope I’m almost over it.

I mentioned a while back that I received chocolate to try out, and as you can see, I’ve been loving it. (In case you missed it – Chocolate Covered Strawberry Pizza and Graduation Oreo Truffles)

When I accidentally-on-purpose bought these lemon Oreos, I knew immediately that coating them in white chocolate was the way to go.  Hence, White Chocolate Lemon Oreo Truffles were born. Oreo Truffles are ridiculously easy, yet very tasty. The lemon and cream cheese is a really good flavor combo. Speaking of flavor combos…Oreo is getting a little cray cray with their Watermelon, Birthday Cake, etc flavors. HOWEVER, I have to say that the Peanut Butter Oreos are pretty dag-gone tasty. I’ve seriously been thinking of all the different things to make with them, but so far I have refrained. It’ll happen soon I’m sure…willpower never holds out for long.

White Chocolate Lemon Oreo Truffles

1 package Lemon Oreos

4 oz. (1/2 package) cream cheese*
8 oz white chocolate, melted (I used )
 
*I prefer to use 4 oz. as opposed to 8 like some people do, and I like the 1/3 reduced fat because the cookie/cream cheese mixture can get very oily. 

Add package of Oreos to bowl of food processor. Pulse a few times to chop into pieces.
Add cream cheese to processor. 
Blend Oreos and cream cheese until well blended. Mixture will be thick (like a cookie dough).
Roll into 1 to 1 1/2 inch balls and place on waxed paper lined cookie sheet.
Chill in freezer while preparing chocolate.
Melt chocolate per directions (microwave or double broiler method).
Dip chilled oreo truffles into melted chocolate. Place on wax paper. Allow chocolate to set.
 
Are you on the Oreo train? I’ve actually heard some people say they didn’t like them. We are no longer friends. (I’m kidding!) I go through phases with them. I really wish I could go through a spinach phase, or a broccoli phase…


Chocoley Chocolate sent me samples of some of their products to try. No other compensation was received.

I may be linking up at any of the following – (Monday)   (Tuesday) , ,,, (Wednesday) , (Thursday) , (Friday) ,,,(Saturday)