Orange Creamsicle Pie

Yes, I’m still alive! I know it’s been three weeks since I’ve posted anything, but as usual, it’s been busy around here. The kids may be out of school for summer vacation, but it sure hasn’t slowed down much. We’ve still been going strong with sports…the long days of summer when we complained of how bored we were have disappeared for today’s youth it seems. At least for mine!

Creamsicle Pie

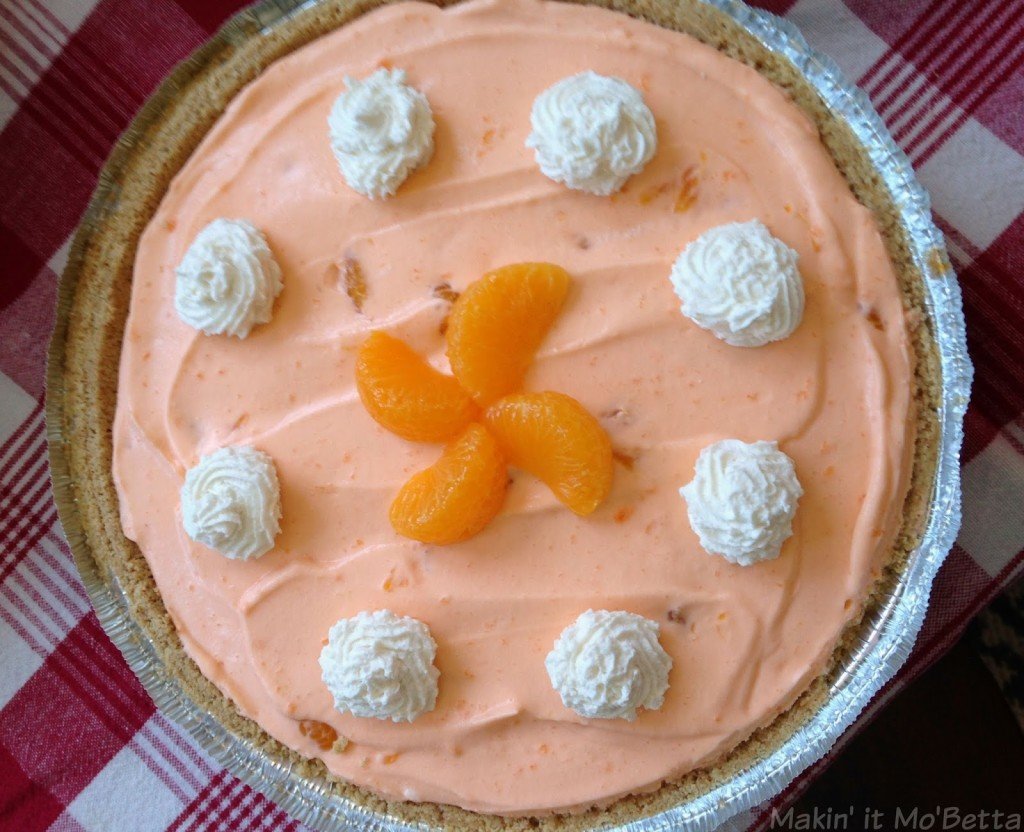
However, in the midst of practices, tournaments, and camps we have still found time to enjoy some fabulous desserts. I will always have time for dessert. This Orange Creamsicle Pie is perfect to have during this hot summer weather. It’s cool, light, and refreshing with it’s creamy orange flavor that will take you back to hot summer days eating frozen orange pops with the white ice cream center. With this pie however, you don’t have to worry about it melting down your hand, leaving it sticky, and no wooden sticks to contend with! (Is it just me, or does anyone else hate the flavor you get next to the wooden stick on a popsicle? It always grosses me out.)

Orange Creamsicle Pie

We loved the orange, but you could make other variations by changing out the jello flavor and fruit I’m sure. Also, I made my whipped cream (it’s so easy!) but you could use Cool Whip if desired. I went with a store bought graham cracker crust, but you could easily make your own there too.

Orange Creamsicle Pie

Orange Creamsicle Pie

Ingredients

  • 1 box orange flavor Jello
  • 1/4 cup boiling water
  • 2 containers of orange yogurt (I used Yoplait Light Orange Creme)
  • 3 cups homemade whipped cream or 1 (8 ounce) tub of Cool Whip
  • 1 cup mandarin oranges (drained)
  • Graham Cracker Pie Crust - storebought or homemade

Instructions

  1. In a large bowl, mix jello packet with boiling water. Stir to dissolve.
  2. Whisk yogurt and whipped cream into jello.
  3. Chop mandarin oranges into halves or thirds, reserving a few for top of pie if desired.
  4. Add oranges to pie mixture. Pour into prepared crust.
  5. Allow pie to set in refrigerator. (I made mine the night before serving)
  6. Top with remaining mandarin oranges and additional whipped cream if desired, before serving.
Recipe Management Powered by
http://makinitmobetta.com/orange-creamsicle-pie/

Recipe Source: 
Other “no bake” pies you might enjoy:
 2- Ingredient 
I may be linking up at any of the following – (Monday) ,  (Tuesday) , , (Wednesday)  (Thursday)  (Friday) ,, ,

Fun Graduation Treats

Whether you are celebrating high school, college, or Kindergarten graduations soon, these fun graduation treats will make any age graduate feel extra special. We will be celebrating 1st, 6th and 8th grade graduations so I will have an excuse to make them as well! (As an added bonus, they are no-bake treats!)

Easy Ice Cream Kit Kat Cake

I know, some of you are thinking ice cream?! As cold as it is? Is she nuts?! Well, uh..probably, but that’s not the point. The point is…my middle child had a birthday in January (she’s twelve!) and this is the cake she wanted.

She is also the reason behind the now infamous (at my house anyway) Kit Kat Candy Cake and last year’s Reese’s Peanut Butter Better Than $#% Cake (so.good.) This year, she wanted an ice cream cake – but not a traditional one with layers of cake and ice cream…she doesn’t allow her ice cream and cake to touch. *insert eye roll* Nope, this ‘cake’ is made entirely of ice cream. And candy of course. With some Oreos thrown in for good measure.

I have to admit, it was very good. It has also given me some great ideas for future ice cream cakes. It was also much easier than I thought it was going to be, which is always a plus. My only complaint is she didn’t want chocolate ice cream. Are we related? I’m not so sure. (I’m kidding daughter of mine. KissKiss LoveYouMeanIt). 

Don’t let the long list of “instructions” fool ya, it’s not difficult, I just added a lot of commentary in there. “Tips” if you will. You’re welcome or I’m sorry. Whichever fits.

Ice Cream Candy Cake 

  • 2 quarts of your ice cream of choice (We used mint chocolate chip and vanilla)
  • 1 package Oreo cookies
  • 1/4 c. milk
    Kit Kat candy bars (I used about 10 Kit Kat bars…which is 40 ‘sticks’)
  • toppings of choice (we used leftover Kit Kat bars, mini M’s, chocolate chips)
  • (optional) 1 tub Cool Whip, thawed enough to spread, for ‘frosting’
 
*You will also need a 9 inch springform pan*
  • Remove ice cream from freezer and let soften so that it is soft enough to remove from carton, but not completely melted (The more melted it is, the more the ice cream will ooze through the Kit Kat bars surrounding the cake. This isn’t a big deal, but just something I learned in the process. It can always be cleaned up afterwards, if you want it really “pretty” on the outside.)
  • While ice cream is softening, combine 24 Oreo cookies and the milk in a food processor (a blender would probably work for this as well). Set aside. This will form the bottom layer or “crust” for the ice cream cake.
  • Spray the springform pan with non-stick spray. Cut a piece of parchment or wax paper into the same size circle as the bottom of the pan. Line the pan with the paper, then line the Kit Kat bars (standing upright) around the inside of the pan. I find that working with the bars in pairs of two works best. Place bars as close as possible to each other, all facing out the same way. You may find that you need a single bar to close a gap. (Another tip I’ve learned along the way…if you are making Kit Kat cakes in the hot summer time, refrigerate the candy bars and remove from the fridge a few at a time. It makes handling them a little less messy.) 
  • Once Kit Kats are in place, press the Oreo crumb mixture evenly on the bottom of the pan.
  • Place in the freezer for 10 minutes.
  • Remove pan from freezer and spread one quart of ice cream evenly over the Oreo crust. I added some chopped Oreos over this bottom layer to kind of break it up. You could layer anything you wanted, or nothing at all…your choice! Place pan back in the freezer for 10 more minutes.
  • Remove from freezer again, and spread the second quart of ice cream over the first, and freeze again for 10 minutes.
  • At this point you can either leave cake in the freezer for 8-10 hours to firmly set or you can add the thawed Cool Whip topping as a ‘frosting’, then freeze for 8-10 hours. Since we used vanilla ice cream on top, I didn’t add the Cool Whip.
  • Remove from freezer 10 minutes prior to serving. Add your toppings of choice, and remove the springform outer ring of pan. Slice and serve! 
*Tip – buy an extra Kit Kat bar or two in case you have a few broken sticks in your packs. Perk: you get to eat all the broken ones.
Source:
I may be linking up at any of the following – (Monday)  (Tuesday) , , (Wednesday)  (Thursday)  (Friday) , ,

Loaded Chocolate Bourbon Fudge

Yes, this was another Christmas gift involving booze, but would also be fun for Valentine’s Day. And seriously, anytime you throw together chocolate and booze…it’s going to be a fun day.

Even though this is not my most beloved old-fashioned fudge, it was pretty darn good…I happen to love Jim. And Jack.  It’s also easy…no candy thermometer required! And before anyone asks, yes you can omit the alcohol.

The toppings are your choice as well. I used what I had on hand…Heath Toffee Chips, Mini Baking MM’s, mini Hershey kisses, chocolate drizzle…and I tried doing a white chocolate drizzle, but my chocolate seized up on me…I think it got some water in it. I was doing multiple things at once and that’s never good when dealing with melted chocolate!

Loaded Chocolate Bourbon Fudge

20 ounces semi-sweet chocolate, chopped (I used , half milk and half dark chocolate)
1 can sweetened condensed milk
1 teaspoon vanilla extract
3-5 tablespoons bourbon (I used 5 – Jim Beam and )
approx 1-1/2 cups of desired toppings
1/2 cup milk chocolate, melted

  • Line an 8×8 pan with parchment paper or spray with non-stick cooking spray.
  • Melt the 20 ounces of semi-sweet chocolate in the microwave or using the double boiler method (I almost always use the microwave, just remember to microwave it slowly. I heat for one minute, then stir, then heat for 15 seconds until mostly melted, stirring between each interval).
  • Once melted, stir in sweetened condensed milk and vanilla extract
  • Stir in bourbon 1 tablespoon at a time. The mixture will thicken, but continue stirring or folding with a sturdy spoon.
  • Pour the chocolate mixture in the prepared pan and place in fridge for 10 minutes to set.
  • Melt the 1/2 cup milk chocolate using desired method and spread a couple of tablespoons evenly over the top of the chilled fudge. Immediately sprinkle on desired toppings, gently pressing into the chocolate.
  • Use the remaining milk chocolate and drizzle it over the top. This will help keep all the good stuff from falling off when cutting.
  • Let set in the fridge for at least 30 minutes.
  • I recommend cutting into small pieces (about an inch or so, because it is very rich!)
Recipe Source:
 
I also highly recommend that when cutting this, have it on a nice, flat, non-slip surface. Otherwise, half your fudge may end up on the floor. When it hits the floor, all of your toppings will pop off, fly all over the kitchen, creating havoc as you try to keep two dogs from eating the chocolate. Also, causing much swearing to occur and resulting in your friends getting half the amount of fudge that was intended. I’m just sayin’…it could happen. #thisismylife
 
Disclosure: I received both Chocoley Chocolate and Rave Reviews! Culinary Spirits as samples. This is not a paid post. 
I may be linking up at any of the following – (Monday)  (Tuesday) ,, (Wednesday) , (Thursday)  (Friday) ,  ,

Cranberry Mousse (aka Jello Salad)

When I was growing up, my Grandma always had some type of jello salad at family gatherings. I, being the picky, stubborn, petulant child that I was, would never eat the jello salad because I do not like jello. And it often had either marshmallows or fruit cocktail in it…and I didn’t like those either. Don’t you feel sorry for my parents? Anyway, jello salad consisted of jello, obvi, and fruits, nuts, etc. If it was formed or molded into a shape…it was called a jello mold. I’m telling you all this for no apparent reason just to say that for Thanksgiving I wanted to make a jello salad. My Grandma is no longer on this earth, but she is very much a part of me and I knew my mom would like it. I found a recipe that felt familiar and I liked from Taste of Home, but they have given it a much more sophisticated name…Cranberry Mousse.

But to me, it will always be jello salad. You can call it whatever you like, but I know something else we can call it – a keeper! It was delicious! Obviously my tastes have changed a little over the years, and even though I still don’t care for jello, this salad/mold/mousse has a lot of flavors and textures going on and I really enjoyed it. I also decided to lighten it up by swapping out the sour cream with Greek yogurt. The ending result was delish. If I do say so myself. Which I do. I think my Grandma would be proud!

This plastic mold actually came from my Grandma’s house, but you could use any pan you like (it doesn’t have to be in a mold, I just think it looks pretty!) I have a Christmas tree shaped baking pan that I want to try for Christmas. Yes, I plan on making this again! I think it’s perfect for the holidays with it’s bright color and I love the multitude of textures going on…you have cranberries, crushed pineapple, crunchy nuts, then the creamy yogurt/gelatin combo. And even better…it’s easy!

Cranberry Mousse (aka Jello Salad)

1 package (6 ounces) strawberry gelatin
1 cup boiling water
1 can (20 ounces) crushed pineapple, drained (SAVE juice)
1 can (14 ounces) whole-berry cranberry sauce
3 tablespoons lemon juice
1 teaspoon grated lemon peel
1/2 teaspoon ground nutmeg
2 cups (16 ounces) Greek yogurt (I used , can also use sour cream)
1/2 cup chopped pecans
  • In a large heat proof bowl, pour in gelatin mix. Add boiling water and stir until jello mix has dissolved.
  • Add juice of drained pineapple.
  • Stir in can of cranberry sauce, gently breaking up the large chunks.
  • Add lemon juice, lemon peel and nutmeg. Stir to combine and chill until mixture begins to thicken. (Not fully set, just thick like pudding)
  • Remove from fridge and fold in yogurt, crushed pineapple and pecans.
  • Pour into desired serving bowl or a lightly sprayed mold (9-cup).
  • Chill until set, at least 2 hours. (I made mine the day before)
  • If using a mold, let mold sit at room temp for 20-30 mins., inverted onto serving plate. Gently remove from mold. It will soften as it warms, but not so soft that it loses shape.
Recipe Source: & my Grandmother
 
What kinds of foods are traditions at your house? Are there certain foods that always trigger memories for you? 
 
 
I may be linking up at any of the following – (Monday)  (Tuesday) , ,, (Wednesday) , (Thursday) , (Friday) ,,(Saturday) 

White Chocolate Lemon Oreo Truffles

So…obviously I’m having a hard time in the ‘blogging regularly’ department. I’ll tell ya, when I was blogging everyday, I got fat. All that cooking, eating, and sitting was not a good combo. I’m still cooking and eating, but instead of using my free time here, it’s been at the gym. Much better for my waistline, not so great for this here blog. I hope you all will bear with me as I try to get a routine going again.

Anywho, in other news….I’ve been going through an Oreo ‘phase’. Specifically, an Oreo Truffle phase. It’s madness. My thighs seriously hope I’m almost over it.

I mentioned a while back that I received chocolate to try out, and as you can see, I’ve been loving it. (In case you missed it – Chocolate Covered Strawberry Pizza and Graduation Oreo Truffles)

When I accidentally-on-purpose bought these lemon Oreos, I knew immediately that coating them in white chocolate was the way to go.  Hence, White Chocolate Lemon Oreo Truffles were born. Oreo Truffles are ridiculously easy, yet very tasty. The lemon and cream cheese is a really good flavor combo. Speaking of flavor combos…Oreo is getting a little cray cray with their Watermelon, Birthday Cake, etc flavors. HOWEVER, I have to say that the Peanut Butter Oreos are pretty dag-gone tasty. I’ve seriously been thinking of all the different things to make with them, but so far I have refrained. It’ll happen soon I’m sure…willpower never holds out for long.

White Chocolate Lemon Oreo Truffles

1 package Lemon Oreos

4 oz. (1/2 package) cream cheese*
8 oz white chocolate, melted (I used )
 
*I prefer to use 4 oz. as opposed to 8 like some people do, and I like the 1/3 reduced fat because the cookie/cream cheese mixture can get very oily. 

Add package of Oreos to bowl of food processor. Pulse a few times to chop into pieces.
Add cream cheese to processor. 
Blend Oreos and cream cheese until well blended. Mixture will be thick (like a cookie dough).
Roll into 1 to 1 1/2 inch balls and place on waxed paper lined cookie sheet.
Chill in freezer while preparing chocolate.
Melt chocolate per directions (microwave or double broiler method).
Dip chilled oreo truffles into melted chocolate. Place on wax paper. Allow chocolate to set.
 
Are you on the Oreo train? I’ve actually heard some people say they didn’t like them. We are no longer friends. (I’m kidding!) I go through phases with them. I really wish I could go through a spinach phase, or a broccoli phase…


Chocoley Chocolate sent me samples of some of their products to try. No other compensation was received.

I may be linking up at any of the following – (Monday)   (Tuesday) , ,,, (Wednesday) , (Thursday) , (Friday) ,,,(Saturday) 

Copycat Reese’s Peanut Butter Eggs {Recipe Repeat}

Even though Easter is coming later this year, it is still coming too fast for me! I think the weather is partly to blame for my lack of Easter prep…it hasn’t felt like Spring! But with the Easter Bunny arriving this weekend, I better get myself in gear. One thing that is a ‘must have’ around here, as far as Easter candy goes, are peanut butter eggs. Chocolate covered, peanut butter filled, shaped like eggs….yes, please.

Lucky for us, (lucky being a relative term here), I discovered how to easily whip these up at home with just a few ingredients, and no BUTTER. Don’t get me wrong, butter is awesome. However, I don’t want to eat it when it’s not necessary…you know, the whole ‘moment on the lips, lifetime on the hips’ thing. I’m not saying these peanut butter eggs are healthy, but there are no weird ingredients, no added butter, and they taste awesome.
 
The filling is only 3 ingredients and then it’s dipped in chocolate. In my experience, regular peanut butter works better than natural peanut butter, but natural peanut butter can be used if you chill the dough well (the filling get’s soft and hard to dip otherwise.) I also recommend doubling the posted recipe, because they are that good! HERE is the link to the original post. Enjoy!

No-Bake Chocolate Pie

So…it’s the later part of January. How are those resolutions going? I know most of us are trying to get our healthy on, but it doesn’t stop our brain from telling us to EAT CHOCOLATE does it? I crave chocolate on a pretty regular basis, and have been pretty creative in coming up with ways to satisfy those cravings without using a days allowance of points. (Weight Watcher talk) This Chocolate Pie is a delicious way to satisfy cravings, without totally breaking the calorie bank.

This recipe came from Mr. Brown. Alton Brown that is. It was pretty awesome. You would never know the main ingredient was tofu. I was calling this ‘Special Ingredient Chocolate Pie‘…but then I saw the movie ‘The Help’ based on a comment a reader made. So, I decided a new name was in order!

No-Bake Chocolate Pie

1 bag (13 ounces) semisweet chocolate chips
1/3 cup coffee liqueur (store bought or )
1 teaspoon vanilla extract
1 pound silken tofu, drained
1 tablespoon honey
1 (9-inch) prepared chocolate wafer crust (I used chocolate graham cracker but Oreo would have been better!)

  • Place about an inch of water in the bottom of a 4-quart saucepan. Bring to a simmer over medium heat.
  • Melt the chocolate chips, coffee liqueur and vanilla in a medium metal bowl set over the simmering water, stirring frequently with a rubber or silicone spatula. 
  • Blend the tofu, melted chocolate and honey in a blender or food processor until smooth (about a minute)
  • Pour the filling into prepared pie crust and refrigerate for 2 hours, or until set. 

Source: Alton Brown’s


You will be amazed at how unhealthy this chocolate pie tastes. And I’m pretty sure no one will be able to guess the special ingredient!

If interested in other special ingredient desserts, you might want to check out my Biscoff Cookie Dough Dip, Deep Dish Cookie Pie, or Double Dark Chocolate Cookie Balls!

I may be linking up at any of the following – (Monday) , , , , , , , , , , (Tuesday) , , ,,, ,  and ,  ,  (Wednesday) , , , , , ,   (Thursday)  ,, , ,  (Friday) ,  , , , , ,, , , ,, , , ,, , (Saturday)  , , , 

Creamy Hot Cocoa Mix

Yesterday’s post was about easy, no bake gifts in jars. One of the things we put in jars this year for teachers’ gifts was this homemade hot cocoa mix.

It was very simple to mix together, and it was really good! Obviously we had to sample some before giving it away 🙂

We made hot chocolate to drink while watching The Polar Express. One of our favorite Christmas movies!

Creamy Cocoa Mix

  • 4 cups nonfat dry milk powder
  • 1 1/2 cups sugar
  • 1 cup non-dairy coffee creamer
  • 2/3 cup unsweetened cocoa
  • 1 box instant chocolate pudding (approx 4 oz size)

Add all of the ingredients to a large bowl. Stir to combine. For a finer consistency, process in a food processor or blender. (I ran mine through the food processor). Store in an airtight container. Add 1/4 cup mix (or to desired taste) to an 8 ounces of warm milk, water or coffee.

Recipe from
To give as gifts, I put the hot cocoa mix in bags and placed in jars, along with marshmallows, peppermint sticks and Hershey’s Hugs and Kisses.
Then we added the jars to baskets with some other goodies and added this cheese-y little poem…
Because you are my teacher and I love you so much,
Here is some hot chocolate and such….
Just mix with warm milk or coffee too,
my mommy said about 1/4 cup should do.
Then to your cup add some yummy marshmallows,
and don’t forget the Hugs and Kisses from one of your favorite fellows!
Merry Christmas! Love, Mr. Three
 
Obviously these were for my son’s Kindergarten teachers! I hope they enjoy their baskets b/c they are awesome and my son loves them both.
I plan on making more mix soon to have at home, except I want to use Hershey’s Dark Cocoa and Hershey’s Dark pudding! yummmm! This Hot Chocolate on a Stick is also fun to make and eat…oh yeah, and to give away!

Easy Gifts in Jars {No Baking Required!}

OHMIGAHHH y’allllll…..it’s Christmas time! I mean, like, it’s HERE. As I say every year, I’m not ready/It’s come too fast/I still have so much to do/I want to do more baking…yada yada yada. Well, I can freak out but it’s not going to change anything. Things have been really crazy these last couple of months (or ‘totes cray‘ if you will…) I haven’t talked about it on the blog because…well, I don’t know why. I just haven’t. I go through phases of wanting the blog to be more anonymous to wanting to share everything. It’s kinda weird putting all your business on the internet, but on the other hand, I’ve gotten a lot of inspiration and encouragement from other people’s business on the internet!

**Skip the following paragraph if you don’t want to hear my life story**
The short version is that my oldest child was diagnosed with , and has been in a back brace for the last month. Being that she is only 12, I was freaked out, as any mother would be. Plus seeing your children in severe pain is horrible. Thankfully the pain was short term (so far). I advise anyone with very active children to look this injury up and be aware of the symptoms b/c I was not at all aware that she was at risk. I’ve had my own share of health issues as well, and finally took my procrastinating self to the doctor. I am a nurse, and I knew something wasn’t right, but I guess it’s human nature to put bad news off as long as possible! Thankfully, it wasn’t that bad and there is an easy fix. My thyroid is out of whack, hypothyroidism, and it is amazing how many body systems your thyroid affects. So, all my life drama in a paragraph. Don’t get me wrong, I feel blessed beyond measure because I KNOW how much worse things could be and I feel so very fortunate. However, these little hiccups in life will derail your “normal” routine. Hence, very slack in the blogging department!
**pick up here for Easy Gifts in Jars**  

As much as I love to bake, especially during the holidays, sometimes (most of the time) TIME is an issue. That is probably one of the reasons I like mixes so much! Plus the fact I love the sweet and crunchy combo.
This one is super easy, and loaded with chocolate. My favorite combo of all! Just mix everything you see in a large bowl (add anything you like!)
Once it’s mixed, you can either sit it out for a party or for everyone to grab a handful as they walk by (which my kids did frequently!) or you can package it up in some little jars to give away.
Some of you may recognize those jars…yep, recycled Biscoff jars!! My local stores have only just recently started carrying Biscoff in plastic jars, so I have many glass jars that I’ve saved and use for storage. Or gift giving! Just slap a label on top and you are good to go.

Chocolate Lover’s Chex Mix

2 Bags Chex Mix (Dark or desired flavor)
1 cup Vanilla Chex Cereal
1 cup Chocolate Chex Cereal
1 small bag of Kit Kat miniatures (chopped in half)
1 cup semi sweet M and M’s
1 cup Gingerbread M and M’s
Mix everything in a bowl. Done!
I think a nice touch would be to spread the mix out on cookie sheets and drizzle with white chocolate. Once it cools, then add to jars. I plan on doing that with the 2 jars I have left. 
 
The great thing about this is that it is easily tailored to whatever you have on hand, or what you or the person getting the gift likes. I am thinking a good variation would be to add pretzel M&M’s and pretzels to the mix for some sweet and salty action. Or mini peanut butter cups and peanuts would be delish. The options are pretty much endless.
Last year, I made these-
Little jars from the dollar store, and I painted the tops with chalkboard paint. I added some ‘Christmas Crunch’ aka White Trash Mix to the jars. (Another easy, no bake mix!)
This year, for my son’s teacher gifts, I found these cute jars at Wal-Mart. They have a snowman and a snowflake on them. I filled them with peppermint sticks, marshmallows and homemade hot chocolate mix, along with some Hershey’s Hugs and Kisses. I can’t believe this is the only picture I took! I’ll try to get the hot chocolate mix posted soon b/c it was very good.
Just a few last minute, quick and easy gift ideas!