Chocolate Caramel Shortbread Cookie Bars & GIVEAWAY!

I was provided with a Krusteaz Holiday gift pack to facilitate this post. All opinions expressed are my own.

My Christmas baking list is quite long (shortbread, gingerbread, fudge, sausage balls, and so much more!) & I have been in a cookie baking frenzy. Well, I was. Until my 7 year old had a terrible asthma flare up that has been going on for weeks now. Several doctor visits, multiple medications, and let’s not forget – NO SCHOOL. I have three kids, and one of them is not in school with only a couple more weeks till Christmas! Do you see where I’m going with this?

Cookie gifts

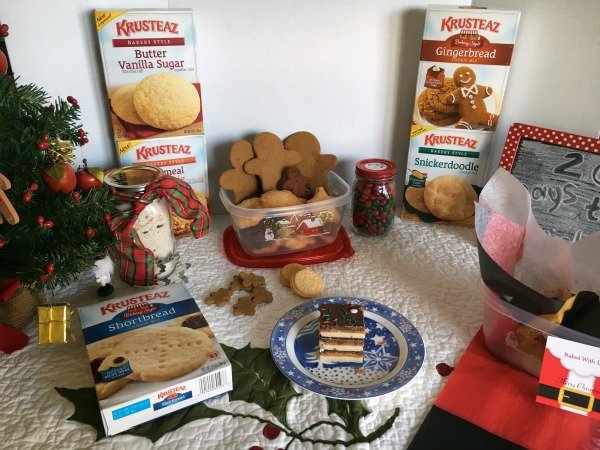
BUT, there is one thing I do not need to panic over, and that’s the holiday treats. With the help of Cookie Mixes, we can have all the fun Christmas cookies, without all the time & effort on my part. Not to mention, I don’t have to stress over gift giving. I have a few options to share that will help you if you are short on time this holiday season as well. And seriously, is there ever enough time?!

Oatmeal Scotchie Food gift

Food gifts do not always have to be prepared ahead of time. Many people have lots of goodies on hand during the holidays, so packaging up mixes that can be easily prepared later is a fun gift. You can mix up a homemade cookie mix, or you can save yourself some time and package up a Krusteaz mix. Just place in a mason jar (because everything looks cute in a mason jar) add a bow and some instructions on how to bake! I added red, green & chocolate chips to the above jar of mix. You could also layer the chips in the jar with the mix. (Provided you don’t start layering, then knock the jar over so that they get mixed up. Not that I would know about that. *ahem*)

You can also add some Hot Chocolate Mix, because we all know hot chocolate goes great with cookies!

Chocolate Caramel Shortbread Bars

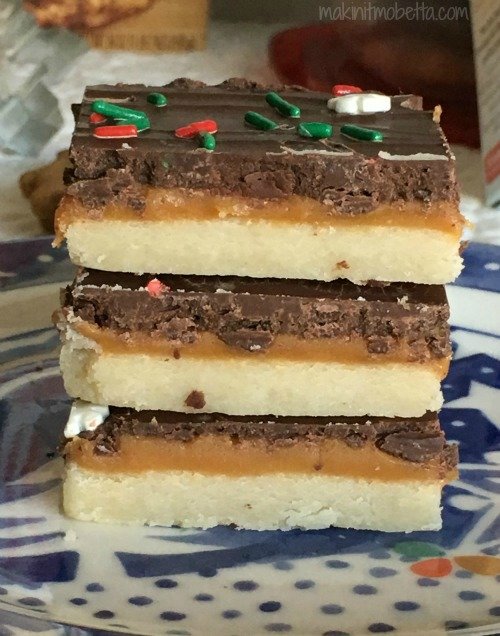
On the other hand, baking up treats to take to a friend, neighbor, teacher, etc. is always fun too. Save yourself some time with shortcuts, like using Krusteaz Shortbread Mix to make these yummy Chocolate Caramel Shortbread Cookie Bars!

Chocolate Caramel Shortbread Cookie Bars

Chocolate Caramel Shortbread Cookie Bars

Ingredients

  • Krusteaz Shortbread Cookie Mix
  • 3/4 cup butter, softened
  • 1 bag caramels (I used Kraft Caramel Bits)
  • 2 tablespoons milk
  • 1 cup semi-sweet chocolate chips
  • sprinkles (optional)
  • sea salt (optional)

Instructions

  1. Preheat oven to 350 degrees.
  2. Line an 8 x 11 or 9 x 13 baking dish with parchment paper (to easily lift bars out of pan for cutting)
  3. Mix cookie mix with softened butter (as directed on package).
  4. Evenly press cookie mix into prepared dish.
  5. Bake until done - time will depend on size of pan used. Check for browning around edges and fully cooked in center. Remove from oven.
  6. Microwave caramel and milk in a microwave safe bowl according to package directions.
  7. Once melted, pour over baked shortbread.
  8. Sprinkle with sea salt if desired for a salted caramel bar.
  9. Let cool a few minutes so caramel is slightly firm to touch (you can stick this in the fridge to speed it along! This just keeps the chocolate from sinking into caramel.)
  10. Melt chocolate chips in a microwave safe bowl according to package directions. Once melted, pour over caramel. Top with sprinkles if desired.
  11. Allow to cool before cutting into squares.
Recipe Management Powered by
http://makinitmobetta.com/chocolate-caramel-shortbread-cookie-bars/

shortbread bars

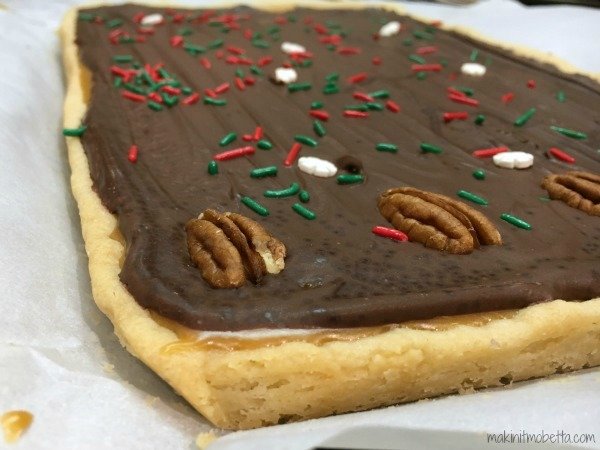
The pan size will determine the thickness of the crust. I used an 8 x 11. You could also add nuts. I added just a few to one end, since my son is allergic.

Christmas Food Gifts

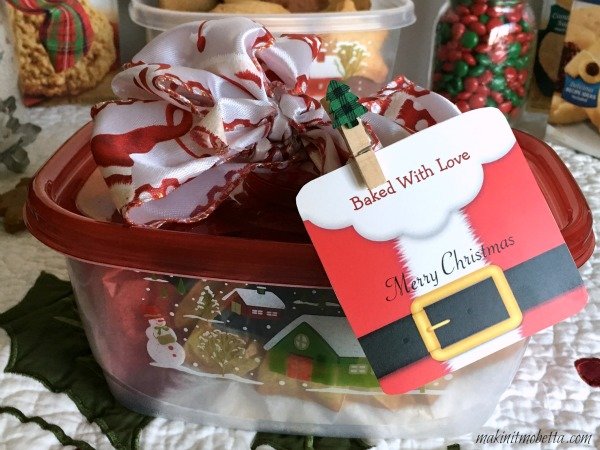
Package your treats in a food safe container, lined with festive tissue paper and a cute tag! My tags & tissue paper came from Zazzle.com, and the little tree clips and plastic container came from Target.

Krusteaz & I would like to help decrease your holiday stress level as well! We have a huge cookie prize pack to giveaway! It includes:

Krusteaz

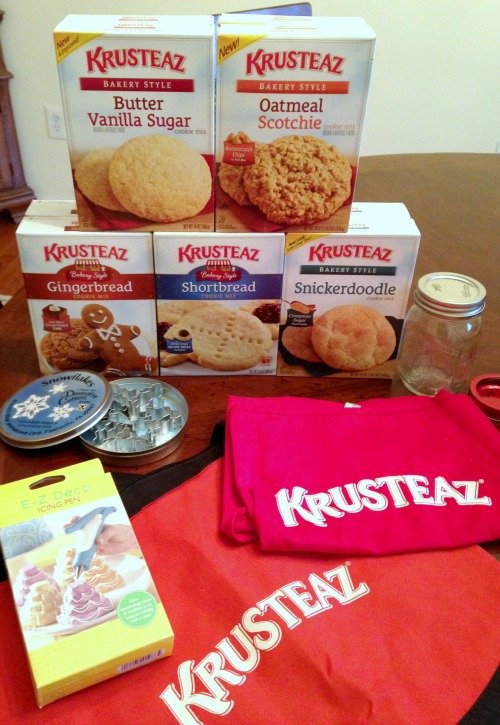
  • Two boxes of the following mixes: Shortbread, Gingerbread, Snickerdoodle, Butter Vanilla Sugar and Oatmeal Scotchie
  • Some fun holiday baking items like an apron, tote bag, cookie cutters, frosting decorating pen and a mason jar (for gifting and storage!)
  • Holiday cookie recipe ideas for inspiration

Please enter via the rafflecopter form. This giveaway ends soon so that we can (hopefully!) get the winner their cookie prize pack before Christmas (No guarantee on that.) Open to US residents, 18 years or older.


I may be linking up at any of the following – (Monday) , The Dedicated House, , ,  (Tuesday) ,, ,  (Wednesday) , , , ,  (Thursday) , ,  (Friday) , , , ,, , , , 

The Best Cookie Icing!

Cookie (and cake) decorating is a fine art. I’ve seen some beautifully decorated and detailed cookies, and I think “Wow. I do not have the patience for that.” And really, if I put so much time into decorating a cookie, I certainly wouldn’t want anyone to just eat it. Therefore, I am not a cookie decorator. However, I am partial to slapping a glaze and some sprinkles on a cookie and calling it a day.

Sprinkles are fun. My kids love them, and let’s face it, icing is extra sugar so it makes cookies even better. Mo’betta if you will.
I love a good homemade cookie, but I don’t stick my nose up at a box mix either. When I saw this new Meyer Lemon cookie mix, I just had to give them a try. Did you catch my “all things Meyer Lemon” post? Love them. I thought adding some icing and sprinkles (and the mix came with the colored sugar) would make a pretty and Spring-y cookie. Since it was 20 degrees but felt like OMGthisisridiculous degrees, I needed something to get me through!
Sometimes you just have to bake your own sunshine.
In the past, I have made icing for cookies, but it usually stayed wet and sticky or got dry and flaky. This past Christmas, when making Gingerbread Men with the kids (that I forgot to post!), I stumbled upon the perfect icing. It hardens enough that you can stack a cookie or two on top of each other, but not rock hard so it’s crunchy. It’s like edible puff paint! It is now my go-to cookie icing, whether it’s gingerbread men or sugar cookies.
You can use different extracts to change the flavors, or add food coloring to make different colors and it always sets up nicely. My kids got very creative at Christmas!
Cookie Icing (Glaze)
1 cup powdered sugar, sifted
1 tablespoon milk
1 tablespoon corn syrup (light)
1 drop of lemon juice (we added several drops to give it a lemon flavor for lemon cookies above)
  • Add all ingredients to a small bowl and stir to combine. Add food coloring if desired. Top cookies with glaze and add sprinkles before the icing sets.
*For cookie decorating tips, such as flooding, outlining, etc. see the recipe source at *
I may be linking up at any of the following – (Monday)  (Tuesday) , , (Wednesday)  (Thursday)  (Friday) ,

Chewy Chocolate Chip Cookie Bars {my favorite bar recipe!}

I know I post a lot of cookies. Like…a lot.of.cookies. I love cookies. Cookies are probably my dessert of choice. And I’ve already typed cookies several times and I’ve just started. Well, I’m not breakin’ out the thesaurus. My point is I’ve baked a lot of cookies, and I have my “go-to” cookie recipe, but these are cookie BARS. Meaning, they are even easier because you don’t have to measure them out, space them, stand near by to bake batch after batch. Yep…these are homemade cookies, made easier, and just as awesome. You’re welcome.

This is my favorite cookie bar recipe to date. No waiting for butter to soften, no scooping out even amounts of dough, just mix it up, slap it in a pan, and bake. Did I mention they are soft, chewy and delicious? These were made with all chocolate chips, but we made some for Thanksgiving with chocolate chips and M and M’s.

I like the ease of this recipe, and you can cut them into any size you want, so they can feed a crowd if needed. I hate to say how quickly the 4 of us can go through a batch. It’s embarrassing.

Chewy Chocolate Chip Cookie Bars

2 1/8 cups flour
1/2 teaspoon salt
1/2 teaspoon baking soda
3/4 cup butter, melted and slightly cooled
1 cup brown sugar

1/2 cup white sugar

1 large egg
1 large egg yolk*
2 teaspoons vanilla extract
1 cup semi-sweet chocolate chips

*we have made this without the additional yolk and they were just as good, in my opinion
  • Preheat the oven to 325 degrees. Grease an 11×7 inch baking pan. (Can use a smaller pan for thicker bars or a 9×13 pan for thinner bars, adjust bake time accordingly.)
  • In a medium sized bowl, whisk together the flour, salt, and baking soda.
  • In a large mixing bowl, whisk melted butter, brown sugar and white sugar until combined.
  • Add the egg, egg yolk, and vanilla to the sugar mixture and mix well.
  • Add the dry ingredients to the wet, and mix just until combined; do not overmix. 
  • Fold in chocolate chips. (Can reserve a few for the tops if desired.)
  • Press the dough into prepared pan and level out with spatula (or hands). Sprinkle reserved chocolate chips on top if desired. 
  • Bake approximately 25 minutes (depending on pan size), until the top of the bars are a light golden brown. They should still be a little glossy on top, like they are not quite fully baked so they will be nice and chewy.
Recipe Source:
So…who’s ready to make cookies?! Above is my favorite homemade cookie bar recipe (as of this posting anyway!), this is my favorite for individual cookies, and this is my favorite cookie bar using a cake mix!
I may be linking up at any of the following – (Monday)  (Tuesday) , , (Wednesday)  (Thursday)  (Friday) ,

Red Velvet Cookies

In honor of that sappy holiday coming up, the kids and I made some treats. One being these Red Velvet Cookies

Because even though Valentine’s is all lovey, dovey, romance-y grossness…I will use any excuse to make cookies! That’s how I roll.

The dough was delicious, but not as red as it was supposed to be since I thought we had plenty of red food coloring, and of course, we didn’t. Story of life. The MM’s are Red Velvet too! They were just okay IMO (in my opinion. I’m getting all text savvy. Not really.) You know I love you little hard shelled candies, but this was not my favorite flava. Sorry love. Obviously, you could use any M’s you choose (html code hates the ‘and’ symbol and does weird things if you are wondering why I am not writing MM’s correctly. Just a little useless fyi.)


Red Velvet Cookies

1-1/2 cups all-purpose flour

1/4 cup unsweetened cocoa powder

1 teaspoon baking soda
1/4 teaspoon salt
1/2 cup unsalted butter, softened
3/4 cup brown sugar
1/4 cup granulated sugar
1 egg
1 tablespoon milk
2 teaspoons vanilla extract
1.5 tablespoons red food coloring (we only had a scant tablespoon)
3/4 cup Red Velvet MandM’s candy

1/4 semi-sweet chocolate chips
  • Whisk together flour, cocoa, baking soda, and salt together in a large bowl. 
  • In a separate mixing bowl, beat the butter and sugars together until creamy. 
  • Add the egg, milk, and vanilla; mix until combined. 
  • Add food coloring and mix.
  • Add the dry ingredients to the wet and mix on low until soft dough is formed.
  • Stir in MM’s and chocolate chips.
  • Cover the dough and chill for at least 1 hour (recipe source says up to 4-5 days and to make sure you let the cookie dough sit at room temperature for 45 minutes before baking if chilling for more than 1 day.) We let ours chill overnight.
  • When ready to bake, preheat oven to 350 degrees F.
  • Line baking sheet with parchment paper or silicone mat. Roll dough into balls (about a tablespoon) and bake about 7-9 minutes. 
  • These cookies do not spread. At all. So when they come out of the oven, press down on the tops to slightly flatten them. You can add a couple of candies or chocolate chips to the tops if desired. 
Recipe Source: (visit source for great detailed baking info. I’m more of a ‘wham-bam, thank you, here’s a cookie’ gal)

 I may be linking up at any of the following – (Monday)  (Tuesday) , , (Wednesday)  (Thursday)  (Friday) ,

Chocolate Peppermint Cookies, Santa’s Snack Mix & ‘Twas…Before Christmas!

This is a sponsored post written by me on behalf of . All opinions are 100% mine.

‘Twas the days before Christmas when all through the store, the moms were all busy buying more, moRE, MORE!! When what to my wondering eyes should appear, but a display full of Christmas candy that I raced to get near! Red ones, greens, big ones and small….I just knew I had to have them all, aLL, ALL!
They had dark chocolate, pretzel, and mini’s too…and when I saw M&M;’S® White Chocolate Peppermint I thought it was too good to be true!

So I grabbed them all up and raced towards the door, I had cookies to bake and egg nog to pour! I would take cookies to neighbors so they wouldn’t be sad, but just then I spotted Holiday Storage products by GLAD!
These would be perfect for the cookies I bake, making it easy and convenient for the goodies I take. I grabbed a few and checked out with a swipe of my card, got home and searched Pinterest long and hard. 

Found the perfect recipe, it was out of sight! And when the cookies were all done I exclaimed “Happy Christmas to all…and to all a goodnight!”

Triple Chocolate Peppermint Cookies

1 1/2 cup all-purpose flour
1/2 cup unsweetened cocoa (I used 1/4 cup Hershey’s Special Dark and 1/4 cup regular Hershey’s cocoa)
3/4 teaspoon baking soda
1/2 teaspoon salt
2 tablespoons instant coffee crystals
1/2 cup butter, slightly softened
1 1/2 cup sugar
2 eggs
1 teaspoon vanilla
1 cup White Chocolate Peppermint M&M;’s ()
1 cup semi-sweet chocolate chips (I used the red and green holiday ones)

  • Whisk together flour, cocoa, baking soda, salt, and coffee crystals together in a medium sized mixing bowl.
  • In a separate bowl, cream together butter and sugar until well mixed, add vanilla.
  • Slowly add in flour mixture to the butter/sugar (I say slowly since I use my stand mixer and everything will be covered in a flour cloud if you pour it all in too quickly). Batter will be thick.
  • Fold in candy and chocolate chips.
  • Chill in refrigerator for 30 mins.
  • Preheat oven to 350 degrees. Line a baking sheet with a silicone mat or parchment paper.
  • After dough has chilled, scoop about a tablespoon of dough and roll into a ball.
  • Place on cookie sheet approx. 2 inches apart.
  • Bake for 9-10 minutes. (The inside will seem slightly underdone.)
  • Allow to cool on wire rack and then consume several. Or package in your Holiday Glad containers and get them over to the neighbors ASAP!

Recipe Source:

Not only are the Glad Holiday Storage containers great for gifting, they also include recipes on the back! Each recipe will fit in the container it comes with. Of course, I just had to try out the Santa’s Snack Mix. The sweet and salty combo is always a favorite around here.

How yummy does that look?!

Santa’s Snack Mix from Glad

  • 8-10 cups Popped popcorn
  • 2-3 cups Holiday shaped pretzels
  • 1 cup red and green Holiday sprinkles
  • 1 package DOVE® Dark Chocolate candies *I used white chocolate drizzle 
  • 2 cups Peanuts *I omitted due to my son’s peanut allergies and used Cheerios instead
  • 3/4 c. Corn syrup
  • 1 tsp. Vanilla extract
  • 1 1/2 c. Sugar
  • 1/2 c. Butter (1 stick)
  • 1 package M&M;’S® Holiday Baking Mini’s and/or M&M;’S® Holiday Mint candies
1. Preheat oven to 325 degrees.
2. In a bowl combine the popcorn, pretzels, and peanuts Cheerios. Set aside.
3. In a small saucepan, melt butter, vanilla, sugar, and corn syrup over low heat until melted and smooth, stirring constantly.
4. Pour over the ingredients in the bowl. Toss until all covered.
5. Spread the popcorn mix on a baking tray or cake pan (may want to use two pans). Bake for 15 minutes. Remove from oven and sprinkle with 1/2 cup Holiday sprinkles, stir. Sprinkle with M&M;’S ® candies, stir again.
6. Place DOVE® chocolates (or white chocolate) in a small microwave safe bowl. Heat for 30 seconds and stir. Repeat until melted and smooth. Drizzle over the popcorn. Sprinkle with remaining sprinkles. Let cool approximately 10-20 minutes (may put in refrigerator so chocolate hardens more quickly. Once cool, break into chunks.
Tip: Store in a perfectly sized GLAD® storage container for up to 7 days.
Perfect 🙂
M&M;’S® White Chocolate Peppermint and Glad Holiday Storage products are ONLY available at Target. Just another reason for me to love them so!
 

Apple Pie Cookies & Dessert Mash-Ups Cookbook Review

I just realized that my last post was also apple pie related, but you will want to stick around for this one too. The cookies are delish, but the cookbook it came from is divine!

It’s from Dorothy Kern, the woman behind the fabulous blog . I have been following her blog for quite a while now and love all the desserts she comes up with. This cookbook is a compilation of dessert “mash-ups”…two-in-one treats like these Apple Pie Cookies. I have several recipes bookmarked, like Chocolate Chip Cookie Toffee Bark (definitely going on my Christmas “to make” list), Cookies ‘n’ Cream Magic Bar Pie (my kids really want to make this!), Oreo Peanut Butter (holy yum) and Pumpkin Pie Magic Bars (I have a thing for magic bars and all things pumpkin. These will be made very soon!)
I’ve been given permission to share the recipe for these Apple Pie Cookies…but if apples aren’t your thing, Dorothy offers variations, like Reese Cups or Hershey Kisses. My kids came up with some of their own variations as well…

Apple Pie Cookies

Yield 30 cookies
Prep Time 20 minutes
Chill Time 30 minutes
Bake Time 11 minutes
1⁄2 cup (1 stick) unsalted butter, softened
1⁄2 cup packed brown sugar
1⁄4 cup plus 2 tablespoons granulated sugar, divided
1 large egg
1 tablespoon vanilla extract
1⁄2 teaspoon baking soda
1⁄2 teaspoon salt
1 1⁄2 teaspoons ground cinnamon, divided
1 1⁄2 cups plus 1 tablespoon all- purpose flour, divided
1 large Granny Smith apple, peeled, cored, and diced small (just about 1 1⁄2 cups)
1⁄2 cup water

Powdered sugar, for dusting *I omitted this
Tip: If apple isn’t your thing, you can simply place the cookie dough in the muffin pans, bake them, and then add a Hershey’s Kiss or a mini peanut butter cup to the top when they come out of the oven. It’s a great flavor twist!
1. Preheat the oven to 350°F. Spray three 12-cup mini muffin pans with cooking spray.
2. Cream together the butter, brown sugar, and 1⁄4 cup of the granulated sugar in the bowl of a stand mixer fitted with the paddle attachment. Beat in the egg and vanilla.
3. In a medium bowl, whisk together the baking soda, salt, 1 teaspoon of the cinnamon, and 1 1⁄2 cups of the flour. Add the dry ingredients to the wet and mix until combined. Cover with plastic wrap and refrigerate the dough for 30 minutes.
4. Place the diced apple in a small saucepan with the water. Cook over medium heat, stirring occasionally, just until the apples begin to turn translucent, about 5 minutes. Drain well and let cool for 10 minutes.
5. Scoop 1-tablespoon balls of cold cookie dough and place one in each cavity of the mini muffin pans. Press down to flatten slightly, and use your finger to create an indent in the centers for the apples.
6. Sprinkle the remaining 2 tablespoons granulated sugar, 1 tablespoon flour, and 1⁄2 teaspoon cinnamon over apples. Stir to combine. Place 1 teaspoon of apples in the hole of each cookie.
7. Bake for 9 to 11 minutes, until the cookies are browned. Cool at least 10 minutes before removing from the pan. It’s easiest to remove them with a knife. Cool completely on a rack, then dust with powdered sugar before serving. Store in an airtight container at room temperature for up to 3 days.
*reprinted with permission from
Needless to say, these cookies didn’t last long! If you have a foodie friend with a sweet tooth on your Christmas list, this cookbook would be an excellent gift. The recipes are awesome and each has an absolutely drool worthy picture to accompany it!
*I was given a complimentary copy of this cookbook for review from Ulysses Press. I received no compensation. All opinions are my own. 
I may be linking up at any of the following – (Monday)  (Tuesday) , ,, (Wednesday) , (Thursday) , (Friday) ,,(Saturday) 

White Chocolate Lemon Oreo Truffles

So…obviously I’m having a hard time in the ‘blogging regularly’ department. I’ll tell ya, when I was blogging everyday, I got fat. All that cooking, eating, and sitting was not a good combo. I’m still cooking and eating, but instead of using my free time here, it’s been at the gym. Much better for my waistline, not so great for this here blog. I hope you all will bear with me as I try to get a routine going again.

Anywho, in other news….I’ve been going through an Oreo ‘phase’. Specifically, an Oreo Truffle phase. It’s madness. My thighs seriously hope I’m almost over it.

I mentioned a while back that I received chocolate to try out, and as you can see, I’ve been loving it. (In case you missed it – Chocolate Covered Strawberry Pizza and Graduation Oreo Truffles)

When I accidentally-on-purpose bought these lemon Oreos, I knew immediately that coating them in white chocolate was the way to go.  Hence, White Chocolate Lemon Oreo Truffles were born. Oreo Truffles are ridiculously easy, yet very tasty. The lemon and cream cheese is a really good flavor combo. Speaking of flavor combos…Oreo is getting a little cray cray with their Watermelon, Birthday Cake, etc flavors. HOWEVER, I have to say that the Peanut Butter Oreos are pretty dag-gone tasty. I’ve seriously been thinking of all the different things to make with them, but so far I have refrained. It’ll happen soon I’m sure…willpower never holds out for long.

White Chocolate Lemon Oreo Truffles

1 package Lemon Oreos

4 oz. (1/2 package) cream cheese*
8 oz white chocolate, melted (I used )
 
*I prefer to use 4 oz. as opposed to 8 like some people do, and I like the 1/3 reduced fat because the cookie/cream cheese mixture can get very oily. 

Add package of Oreos to bowl of food processor. Pulse a few times to chop into pieces.
Add cream cheese to processor. 
Blend Oreos and cream cheese until well blended. Mixture will be thick (like a cookie dough).
Roll into 1 to 1 1/2 inch balls and place on waxed paper lined cookie sheet.
Chill in freezer while preparing chocolate.
Melt chocolate per directions (microwave or double broiler method).
Dip chilled oreo truffles into melted chocolate. Place on wax paper. Allow chocolate to set.
 
Are you on the Oreo train? I’ve actually heard some people say they didn’t like them. We are no longer friends. (I’m kidding!) I go through phases with them. I really wish I could go through a spinach phase, or a broccoli phase…


Chocoley Chocolate sent me samples of some of their products to try. No other compensation was received.

I may be linking up at any of the following – (Monday)   (Tuesday) , ,,, (Wednesday) , (Thursday) , (Friday) ,,,(Saturday) 

Chocolate Covered Strawberry Dessert Pizza

What’s better than chocolate covered strawberries?

Chocolate covered strawberries on top of a chocolate chip cookie crust that’s what.
With a layer of chocolate “sauce”…
And a little extra chocolate drizzled on top, because seriously, can you have too much chocolate? I think not.
A little Cool Whip on top doesn’t hurt either –
Are you on board the dessert pizza train? If not fully convinced, let me just share how easy this is to put together. Like done in 30 minutes easy. Seriously! The secret is pre-made cookie dough and chocolate that melts like buttah. (This was my first time trying chocolate from , and it is awesomely easy to work with. I usually have so many issues when working with melted chocolate and get quickly frustrated, but not this time! And no, I’m not getting paid to say that! I really had the easiest time EVER.)
The kids and I made this (as evidenced by the little fingerprints in my chocolate!) as a special (last minute) Memorial Day treat, and it would be great for any chocolate and strawberry loving father or special man in your life this Father’s Day. Which is coming up VERY soon! June 15th to be exact. How does time fly past me so quickly?! I’ve yet to figure that out. Not to mention strawberry season is in full swing so you can have nice, sweet and ripe berries.

Chocolate Covered Strawberry Pizza

1 roll refrigerated chocolate chip cookie dough (I used Pillsbury, could also use homemade)
2 lbs. fresh strawberries
1/2 lb. chocolate (I used )
Vanilla Cool Whip (optional)
  • Preheat oven according to directions of cookie dough you are using.
  • Spread dough out into desired shape on a baking pan (I used my pizza pan lined with parchment paper since it has holes in it). Press into about 1/2 inch thickness.
  • Bake cookie dough as directed or until lightly browned and fully cooked. Remove from oven and let cool.
  • While cookie ‘crust’ is baking, slice strawberries, reserving a few whole ones for dipping in chocolate.
  • Melt chocolate as directed.
  • Dip whole strawberries into melted chocolate and place on wax paper to cool.
  • Spread remaining melted chocolate onto cooked cookie dough crust, reserving a couple of tablespoons for drizzling if desired.
  • Place sliced strawberries onto chocolate ‘sauce’, leaving the center open for whole berries.
  • Drizzle remaining chocolate over sliced berries and place the set chocolate covered strawberries in center.

Slice with a pizza cutter and top with whipped topping if desired. Enjoy!

As a funny side note – when my son saw the chocolate chip cookie crust, he asked what I was making. I said “I’m making pizza!” He looked very skeptical and said, “well, I will try cheese on it, but I don’t think I want (pizza) sauce”. I laughed so hard, and explained that it was a dessert pizza and would only have chocolate and strawberries on it. I think he was relieved! He was also quite happy with the results.

sent me some of their products to try, no other compensation was received. Boy am I having fun using them 🙂 Expect to see more chocolate covered goodness!
I may be linking up at any of the following – (Monday)  (Tuesday) , ,,, (Wednesday) , (Thursday) , (Friday) ,,,(Saturday) 

My “Go-To” Cookie Base for Thick, Chewy Cookies

I think it’s well established that we make cookies a lot in the Mo’Betta house. I have tried many different recipes for homemade cookies, I’ve taken short cuts and made cookies from cake mix or cookie mixes, and a few months back I found a cookie base recipe that turns out great every time. It makes thick, chewy cookies and doesn’t have to be chilled. However, if you chill the dough, the cookies are even thicker!
We made cookies for the teachers at Christmas….
I also learned the trick to making nice BIG cookies…
Yep, do the double stack for even bigger, thicker cookies!
We made cookies at Easter. I’m a sucker for the seasonal chocolate chips, can you tell?!
We made bite size, thick cookies for the girls’ volleyball coach.
We also made cookies with M&M’s! My son’s favorite. That’s the great thing about this dough…use whatever add ins you want.
We made ‘supersized’ cookies for Teacher Appreciation. My daughter actually made these…using an ice cream scoop to get nice big mounds of dough.
So, the recipe already! I’m now seriously craving cookies. Which is nothing new…

Thick, Chewy Cookies

2 cups all-purpose flour
1 tablespoon cornstarch
1 teaspoon baking soda
3/4 teaspoon kosher salt (decrease to 1/4 if using salted butter)
3/4 cup butter, softened
3/4 cup brown sugar
1/2 cup white (granulated) sugar
1 egg
1 tablespoon vanilla

1 1/2 cups add ins of choice (candy, chocolate chips, toffee bits, nuts, etc.)
  • Preheat oven to 350 degrees if baking immediately.
  • Whisk together flour, cornstarch, baking soda and salt in a small bowl.
  • In a mixing bowl, cream together butter, brown sugar and white sugar until fluffy (medium speed, 2-3 minutes). Scrape down the sides.
  • Add egg and vanilla to mixing bowl, mix until incorporated.
  • With mixer on low, add in flour mixture until dough forms. Scrape sides as necessary.
  • Stir in 1 1/2 cups of desired add ins.
  • At this point, you can cover and refrigerate the dough for a couple of hours or overnight – make sure it’s covered well or the dough will begin to dry out. You can also roll the cookies into balls and freeze to make at a later date.
  • Scoop out dough and place on lined cookie sheet – about a tablespoon for small cookies; “double stacked” tablespoon for larger, thicker cookies; 3 tablespoons or more for large cookies. Just make sure to leave space for them to spread and adjust baking time. Small cookies only need around 8 minutes. You want them to look a little underdone (shiny) in the middle, as they will continue to cook a bit once removed from the oven.
Recipe Source: ,

Now, since National Chocolate Chip Cookie Day is May 15th, I highly recommend making some cookies! If you don’t want to make them from scratch, check out this giveaway!

I may be linking up at any of the following – (Monday)  (Tuesday) , ,,, (Wednesday) , (Thursday) , (Friday) ,,,(Saturday) 

National Chocolate Chip Cookie Day – Celebrating with a GIVEAWAY! {#sponsored}

I love cookies. You may have noticed by the 13,000 cookie posts on the blog. (Mild exaggeration) I have decided cookies are my dessert of choice…more than cakes, cupcakes, pies….cookies are where it’s at. So, when I found out that May 15th was National Chocolate Chip Cookie Day, I had to think of a good way to celebrate. Obviously, I have to make cookies.

My friends at agree that National Chocolate Chip Cookie Day is a day to celebrate with wild abandon. They even have a Triple Chocolate Chunk Cookie Mix to help honor the occasion!
Soft, chewy cookies with slightly crisp edges and filled with chocolate. Yes please!
Are you ready to celebrate with me?!
This cookie photo session had to be cut short due to one of the *models* disappearing. 
Don’t look at me. Those aren’t cookie crumbs around my mouth. Nope. No sir. {wink}
GIVEAWAY
In honor of National Chocolate Chip Cookie Day, Krusteaz has been gracious enough to offer a complimentary box of Triple Chocolate Chunk Cookie Mix, along with 3 free product coupons, to one Makin’ it Mo’Betta reader. Just complete the rafflecopter form and you will be contacted via email if you are the winner! US residents only.

I received a complimentary box of Krusteaz Triple Chocolate Chunk Cookie Mix and 3 free product coupons to help facilitate this post. The winner will receive the same package via Krusteaz. No other compensation was received and as always, all opinions are my own. {And chocolate chip cookies are awesome. That’s just a fact.}