Pumpkin Mesh Wreath

First, YAY!! This is my first “official” post on my new site! And WOW…what a pain in the rumpkus (is that a word?) the Blogger to WordPress move has been. THANK GOODNESS for . Without them, this site would still be sitting here blank I’m afraid. I will spare you all of the details, but it has definitely been one thing after another. Oh, and did I mention that I happened to have surgery AND my computer crashed during all of this as well? Ha! Fun times. Not! Moving on…

Pumpkin Wreath

This Pumpkin Mesh Wreath is festive, (I think it’s cute), cheap, and super easy to make. I don’t do a lot of Fall decorating, but I usually have a Fall wreath, a couple of garden flags, mums, and pumpkins. Our weather has been so wacky, that my mums are already mostly dead (or lack of water could have caused that. Go figure.)

Since I’m a visual person, I’m going to show each step in pictures. I will explain the best I can, but it’s really easy.

Wreath Supplies

Step One: Supplies

  • One wire wreath (I bought mine at Walmart, I think it was $5)
  • Pipe cleaners (ideally in orange, but I already had these from another wreath. $1 from Dollar Tree)
  • long roll of mesh ribbon (This was from Walmart or Sam’s Club, also around $5)
  • ribbon for the top of pumpkin (I used green burlap – $1 from Dollar Tree. See Step 3)

How to begin

Step Two: Making Body of Wreath

  • Place six pipe cleaners at the top and six at the bottom of  the wreath form. If you look at it as a clock, place the first one at 10:00, the last one at 2:00, and put the other four randomly in between for the top. (You can adjust to exactly where you need them as you go along.) The bottom ones can go between 4 and 8:00.
  • Start at the top “10:00” pipe cleaner, attaching the end of your wire mesh. Pull the mesh down and attach at 8:00 as pictured above (is this clock reference getting old, or is it just me?!).

Body of wreath

  • Repeat the up and down pattern with the mesh until the wire wreath form is covered. If you want it fuller/thicker, just add more pipe cleaners to hold in place. Once the wire is covered, you can adjust/fluff wreath to get the look you want.

Final step

Step 3: ‘Stem’ of Pumpkin

  • I used the above pictured burlap ribbon. However, I think a wired ribbon would look better, and give the “stem” some shape and hold. The burlap kind of just lays there.
  • There is no technique for the stem…I just attached it to the top in and up and down pattern, using the ends of the pipe cleaners that were already in place holding the mesh.

And that’s it! I spent $12 and technically I already had the wreath form and pipe cleaners. You can remove the mesh and add something different for Christmas, or you can save the pumpkin to use next year. It’s nothing fancy, and I may tweak it here or there, but overall, I think it’s cute.

I never thought I would like the mesh wreaths, but somehow they grew on me. How about you? What kind of decorations do you have for Fall? Any Blogger to WordPress nightmares you’d like to share?!

This post has been featured at:


I may be linking up at any of the following – (Monday) , , , ,  (Tuesday) ,, ,  (Wednesday) , , ,  (Thursday) ,  (Friday) , , , , ,  

Copycat Sausage McGriddle Casserole & Krusteaz GIVEAWAY {#ad}

I received a gift pack from Krusteaz to facilitate this post. No other compensation was received. All opinions expressed are my own.

This post is full of good things: breakfast food; an easy, kid-approved recipe; and a giveaway! My love for breakfast food is pretty well documented here on the blog. As is my love for casseroles, and breakfast for dinner…which makes an appearance pretty regularly around here. That’s why I am happy to partner with to celebrate National Breakfast Month, and give you some ideas to incorporate Breakfast Night at your house. How about tonight?!

My kids love pancakes. I love sausage and eggs. Since my oldest daughter’s favorite fast food breakfast item is the Sausage McGriddle (from Mickey D’s), this recipe was born. It could be called Breakfast Lasagna because of the layers, or Pancake Casserole, but whatever you call it, give it a try. It’s easy, it’s yummy, it’s filling and it’s just…fun. A little twist on dinner that brings everyone together at the table. Or, you know, you could serve it for breakfast too!

I made my pancakes with Krusteaz pancake mix ahead of time and stuck them in the fridge to make the prep for this even easier.

I was surprised how tasty it was when all layered and baked together.

Sausage, Egg and Cheese Pancake Casserole

12-15 pancakes (depends on size)
8 eggs
1 lb sausage (maple sausage, turkey sausage, or favorite)
2 cups shredded cheddar cheese
maple syrup (optional)
salt and pepper, to taste
  • Preheat oven to 350 degrees.
  • Spray an 8 x 8 baking dish with cooking spray, set aside.
  • In a large skillet, cook sausage on medium high heat until done, crumbling/breaking into pieces as it cooks. Reduce heat to medium.
  • In a bowl, scramble eggs, season with salt and pepper. Add to skillet with sausage. Stir eggs in with sausage and cook until eggs are set.
  • Add pancakes in a single layer to bottom of baking dish. Make sure pancakes are touching or slightly overlapping. I used 5 pancakes for this.
  • Sprinkle 1/4 cup cheese over pancakes.
  • Add 1/2 the sausage/egg mixture to the pan.
  • Top with additional 1/4 cup cheese.
  • Drizzle with syrup, if desired. (Using the maple sausage and/or using maple syrup gives this a more authentic McGriddle flavor. Could also add syrup to pancake mix when preparing.)
  • Repeat layers, starting with pancakes.
  • Top with final layer of pancakes.
  • Sprinkle with remaining cup of cheese.
  • Bake for 15 minutes until cheese is melted.
Slice and serve!
So many Krusteaz products to help make breakfast easy!

Giveaway details:

One prize pack (not pictured) will be awarded to a Makin’ it Mo’Betta reader. It will include:
  • One box of Buttermilk Pancake Mix
  • One box of Belgian Waffle Mix
  • One box of Blueberry Pancake Mix 
  • One Wild Blueberry Muffin Mix 
  • A pancake pen (for pancake art!)
  • A spatula and 
  • A coupon for FREE product
Enter via the Rafflecopter form!

ASUS MeMO Pad 7 LTE Review & GIVEAWAY {$168 value} #ad

This post was sponsored by ASUS and Walmart. All opinions are mine.

For anyone following my little corner of the blog world, you have probably noticed that I have gotten nowhere fast on my ‘dot.com’ endeavor. Let’s just say moving a blog that has been around over 5 years is no easy task! In the meantime, I’ve got bidness to attend to! I have a fantastic giveaway for y’all, and I just couldn’t wait any longer to tell you about it.

If you have kids (or grandkids, or friends and neighbors with kids), I’m sure you know that school is BACK IN SESSION! I think all parents have mixed feelings about this. We are elated to get the kids back-to-school and in their routines again, but it’s also back to hectic mornings, constant chauffeuring, school lunches and the ever dreaded…HOMEWORK. Well, I have something that will definitely help with the homework, and can help us moms (or anyone!) too. There is an app for just about everything these days, and definitely some that help with scheduling, time management, grocery shopping, (or catching up on our favorite TV shows while sitting and waiting for kids to finish practice). That’s where my review of the ® comes in!
It has lots of cool built in features, and tons of available apps through the Google Play Store. Since Chrome is my browser of choice, I love that it’s already pre-loaded and ready to go on the tablet. You can use it to conveniently check email, watch videos, take videos and pictures, read books, play music, browse Pinterest and more! One of my favorite things…SuperNote! You can use it to take quick notes on the go, and you don’t have to worry with typing it in like I do on my phone or my other other tablet…you can write notes with your finger! It’s easy, and much faster for me. Yep, my other tablet (possibly named after a fruit) is not as cool as I once thought. Here are some specifics for the ®:
  • 7” HD tablet with dual front facing speakers and 178-degree wide viewing angle, perfect for watching movies, playing games etc. 
  • Dual cameras: 5MP rear / 2MP front
  • Quad-Core Intel® Atom™ processor 1.3 GHz, gives it the performance to stand out in the 7-inch tablet market. AT&T; 4G LTE network provides speed and reliability at your fingertips
  • Scratch-resistant glass with anti-fingerprint coating
  • 16GB internal storage w/ up 64GB MicroSD Card Support
  • Usage time: up to 10.5 hours Perfect for kids and teenagers
I like the size of the tablet, not too bulky, but big enough that I can easily see it!
As you can see, it’s smaller than a standard composition notebook (approx 7″ x 4″). Another great thing about the ® is that it is much more affordable than other tablets with similar features, and, once your pre-paid time runs out, you have the option of adding it to your existing AT&T; plan (if you have one) or what I like, you can purchase additional pre-paid calling plans at Walmart, so you are always in control of how much you are spending. (The tablet also has WiFi capability.) Learn more by watching this video:
So what do you think? If you are interested in trying the ASUS MeMO Pad 7 LTE® or considering giving it as a gift (Christmas is right around the corner!), you can purchase it at  for $168 AND you can enter my GIVEAWAY!
That’s right, I am giving away one ASUS MeMO Pad 7 LTE® to a Makin’ it Mo’Betta reader! All you need to do is complete one or more entries via the rafflecopter form below.
 
NO PURCHASE OR PAYMENT OF ANY KIND NECESSARY, A PURCHASE OR PAYMENT WILL NOT INCREASE YOUR CHANCES OF WINNING. The Giveaway starts on 9.13.15 and ends on 9.20.15. Open only to legal residents of the 50 U.S./D.C. and 18 years or older as of time of entry. Residents of P.R. are ineligible. Void in P.R. and where prohibited.

Under Construction!

Makin’ it Mo’Betta has finally made the switch…I’m now a “dot com”!! I’m sure that’s only exciting to me, but it’s also time-consuming and stressful. SO, please be patient with me as I get things moved over and functional. Hopefully there will not be too many glitches *fingers crossed*. Thanks for your support!

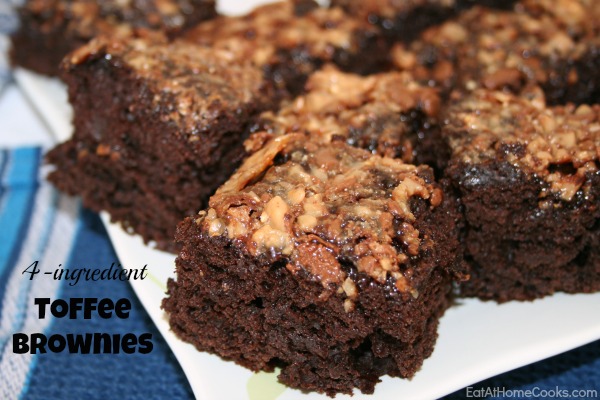
Toffee Brownies {4 Ingredients!}

I love quick and easy recipes and this one satisfies a chocolate craving with just 4 ingredients. It’s a take on one of my blog’s most popular recipes, Chocolate Pudding Dump Cake but uses one of my favorite candies…Heath!

4 Ingredient Toffee Brownies EAH
I’ve shared the recipe for these deliciously easy Toffee Brownies over at , where I am a contributing writer. I’d love for you to head over and check it out!

Breakfast Casserole ‘Muffins’ & VISA Giftcard Giveaway! {#sponsored}

I was provided coupons and a gift card to purchase ingredients for this post by Nature’s Harvest® to facilitate my review of Nature’s Harvest® Bread. All opinions expressed are my own. 

Where has the summer gone?! I’ve already heard of some kids going back to school, and my own go back in a couple of weeks. I really don’t feel like we’ve had much of a break! However, with school being out, I have really been off my normal routine, and with that, meal planning has gone out the window. I’m very ready to get back to planning healthier, balanced meals. This will mean planning for super busy mornings, lunch boxes, and meals in hurry due to various sports practices.  

With so many meals eaten on the go, or prepared in a hurry, it’s easy to opt for convenience foods. However, I still want our nutritional needs met. For example, did you know it is recommended that adults eat 48 grams or more of whole grains daily and children ages 4-13 eat a minimum of 40-48 grams per day? (You can read more about whole grains and guidelines and .) Many of us are not getting enough, which is why Nature’s Harvest® bread has launched the “Whole Grain Challenge”. The challenge is to encourage moms and families to incorporate 48 grams of whole grains into their diets every day. You can find educational content on the and to help stay on track and participants can take the whole grain pledge on the Nature’s Harvest® Facebook page and automatically be entered into a weekly sweepstakes, but hurry, it ends August 10th.

Nature’s Harvest® bread has at least 8 grams of whole grains per serving, no artificial flavors or colors, and no high fructose corn syrup. That gives them an A+ in my book!
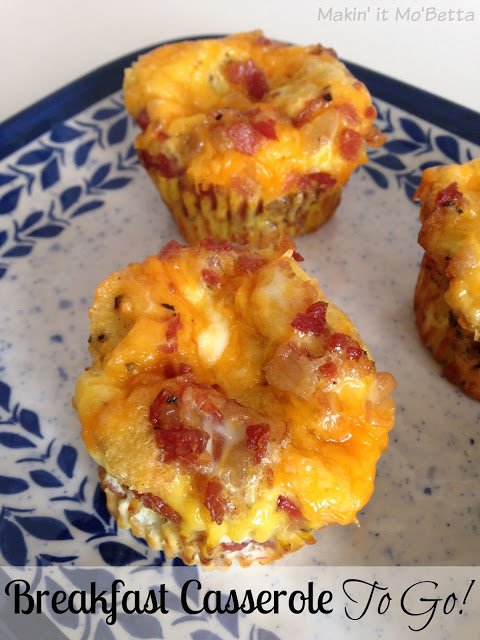
These portable Breakfast Casserole ‘Muffins’ incorporate whole grains, protein rich eggs and cheese and best of all, they are portion controlled, easy to eat on the go, re-heat beautifully (I actually prefer them re-heated the next day!) and I imagine they could even be frozen…but mine have not lasted long enough to find out! They are also a great way to use up leftovers or fresh veggies from the garden, the recipe can be modified to whatever your family likes – add pepper and onions, use ham, sausage, mushrooms, vary the cheeses and spices, get creative!

Breakfast Casserole – To Go!

3-5 slices whole grain bread (enough to fill your muffin tins almost to the top) I used Nature’s Harvest® Butter Top Made with Whole Grain White Bread
1/4-1/2 cup bacon pieces (or meat of choice; I used )
1 cup shredded cheese 
8 eggs
1/2 cup milk
1 teaspoon dry mustard (optional)
1/2 teaspoon sage (optional)
1/2 teaspoon basil (optional)
salt and pepper, to taste
  • Preheat oven to 400 degrees Fahrenheit. Spray a 12 cup muffin tin with cooking spray.
  • Tear or cut bread into 1/2 inch pieces. Place in prepared muffin tin, filling 3/4ths full.
  • Sprinkle bacon pieces over bread, top with cheese.
  • In a medium bowl or large measuring cup, whisk together eggs, milk and spices. Carefully pour into muffin tins, dividing equally. (I just eyeballed this!)
  • Bake for 15-20 mins, or until eggs are set and cooked through.
Recipe adapted from and Makin’ it Mo’Betta
 
These make a handy breakfast, lunch or dinner. I served mine for ‘brinner’ with grits, then reheated the leftovers in the microwave for breakfast with a side of fruit. As I stated earlier, I actually preferred them reheated, which is a rarity, but definitely puts these in my keeper file! 
GIVEAWAY:
Now, how many of you would like to win a $25 VISA Gift Card and a coupon for free Nature’s Harvest® bread? To enter, please use the Rafflecopter form below.  This giveaway has a quick turnaround so go ahead and enter!
 

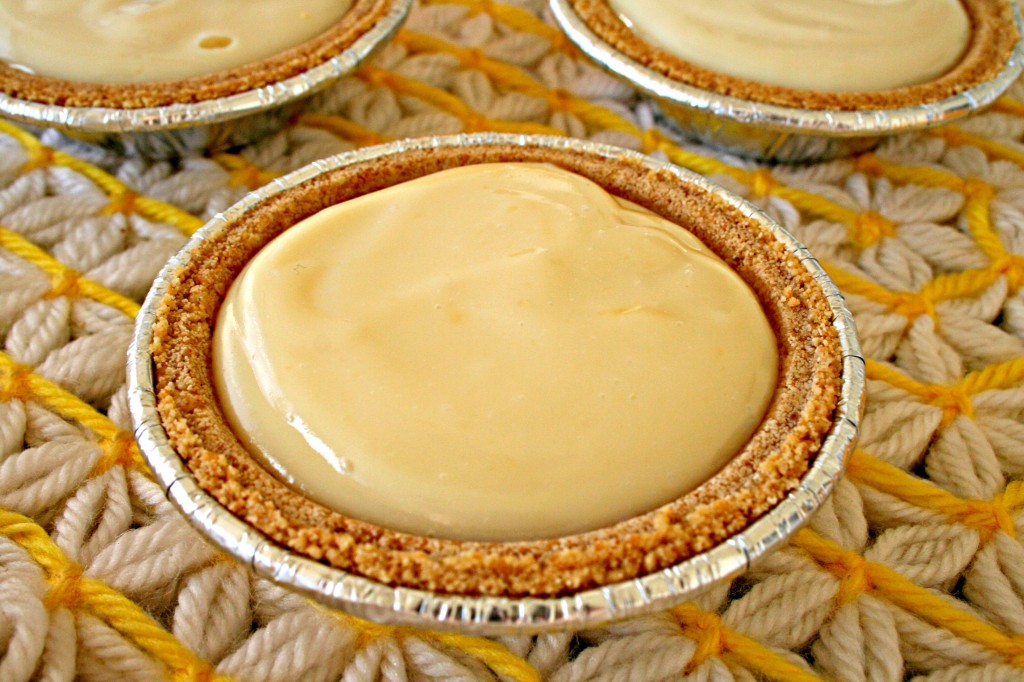
Orange Creamsicle Pie

Yes, I’m still alive! I know it’s been three weeks since I’ve posted anything, but as usual, it’s been busy around here. The kids may be out of school for summer vacation, but it sure hasn’t slowed down much. We’ve still been going strong with sports…the long days of summer when we complained of how bored we were have disappeared for today’s youth it seems. At least for mine!

Creamsicle Pie

However, in the midst of practices, tournaments, and camps we have still found time to enjoy some fabulous desserts. I will always have time for dessert. This Orange Creamsicle Pie is perfect to have during this hot summer weather. It’s cool, light, and refreshing with it’s creamy orange flavor that will take you back to hot summer days eating frozen orange pops with the white ice cream center. With this pie however, you don’t have to worry about it melting down your hand, leaving it sticky, and no wooden sticks to contend with! (Is it just me, or does anyone else hate the flavor you get next to the wooden stick on a popsicle? It always grosses me out.)

Orange Creamsicle Pie

We loved the orange, but you could make other variations by changing out the jello flavor and fruit I’m sure. Also, I made my whipped cream (it’s so easy!) but you could use Cool Whip if desired. I went with a store bought graham cracker crust, but you could easily make your own there too.

[amd-zlrecipe-recipe:22]

Recipe Source: 
Other “no bake” pies you might enjoy:
 2- Ingredient 
I may be linking up at any of the following – (Monday) ,  (Tuesday) , , (Wednesday)  (Thursday)  (Friday) ,, ,

Italian Sausage Sub Casserole

It’s pretty well established over here that I love a casserole. This has been one of my faves as of late, since I love Italian sausage.

This Italian Sausage Sub Casserole may not look pretty, but it’s tasty and pretty quick to throw together. I’ve shared the recipe over at today, where I am a contributing writer. Please head over and check it out!

Coffee Ice Cream and Happy 4th!

If you saw my  yesterday, you know that I am now the proud owner of a Cuisinart Ice Cream Maker. It’s a countertop model that is electric, requires no salt or ice, and makes ice cream scary fast. Like homemade ice cream in 20 minutes fast. It’s awesome.

I *needed* some ice cream to go with these red velvet brownies my daughter made (from a box) and coffee ice cream was calling my name. I whipped up this recipe using sweetened condensed milk (because I love that stuff), let the mix chill for a couple of hours, and then made ice cream for before dinner.
And I just happened to have red, white, and blue MandM’s on hand. #candyhoarder
coffee ice cream

 Coffee Ice Cream

1 cup strong brewed coffee, cooled
1/2 cup heavy cream
1/2 cup milk (I used 2%)
1 can sweetened condensed milk
1 teaspoon vanilla extract
Whisk together all of the ingredients and chill for 1-2 hours (or overnight). Place mixture in ice cream maker and run per manufacture’s instructions. Mine produced a firm soft serve texture initially, and then I placed it in the freezer over night. The result was firm, “scoopable” yet creamy ice cream.
Happy 4th of July! God Bless the USA!
I may be linking up at any of the following – (Monday)  ,  (Tuesday) , , (Wednesday)  (Thursday)  (Friday) ,, ,