America’s Greatest School Nurse Contest

This post has been sponsored by Pfizer Consumer Healthcare. All thoughts and reviews are my own.

As some of you may know, I am a school nurse. So when Pfizer contacted me regarding spreading the word about America’s Greatest School Nurse contest, I was immediately on board! Do you have school age kids? Do you know your school nurse? If your child has been sick or injured at school, or you have a medically fragile child, or your child takes medication during the school day, I’m betting you’ve had a conversation or two with the nurse. They are a great liaison between parents, physicians, and school staff.

I have spoken to the school nurse at my son’s school quite often over the past couple of years! He has asthma, allergies, and migraines…so he has had many a visit to the nurse! I also know first hand that it’s not always an easy job. Kids have medical emergencies (anything from playground accidents to seizures, even drug overdoses) that require split second decision making, and require the nurse to be knowledgable of a variety of different diseases and acute illnesses. They must also be prepared for any kind of emergency, not to mention the multitude of staff trainings that go on each year for diabetes, seizures, asthma, etc. They also do a lot of parent and student education and must have the ability to multi-task – as they may have several kids coming to the office at once. The list goes on and on, and very rarely are any two days the same in a busy school!

So how do you go about nominating your awesome school nurse for America’s Greatest School Nurse contest?

* First, nominations will be accepted nationwide from anyone who would like to honor their exemplary school nurse.
* Second, one nurse from each state plus Washington D.C. will win a prize valued at $500 and will be entered to win the grand prize: the title of America’s Greatest School nurse and a trip for a getaway from school sickness.
* To submit a nomination and get more information/full contest rules, visit AmericasGreatestSchoolNurse.com. Nominations will be accepted from January 9 to February 23.
* Voting will be open from April 3 to April 16 and the winners will be announced in early May.

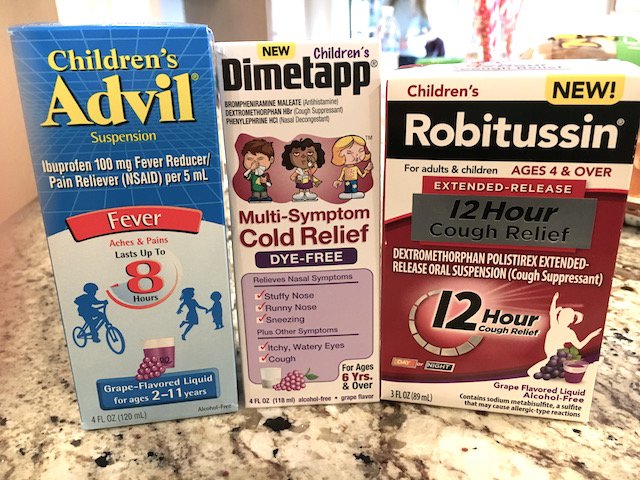
Even though I am a nurse, obviously my kids still get sick. Thankfully, the pediatric brands of Pfizer Consumer Healthcare are there to help – Children’s Advil®, Children’s Robitussin® and Children’s Dimetapp® – to tackle all kinds of symptoms.

Ironically, the Sick Just Got Real™ at my house…I have a sick one at home as I am typing this! My 8 year old woke up at 1am with a stomach virus…which of course included an accident on the carpet as he was trying to make his way to my room (doesn’t it always happen that way?!) The above products can’t help with the stomach virus, but they are great for a multitude of other illnesses.

Children’s Advil® is a go-to in my house for my son’s migraines, and it’s also good for other aches, pains, and fever for kids ages 2 to 11. There’s also Infants’ Advil® White Grape for children 6-23 months. (And if your kids are picky about how medicine tastes, and what kid isn’t, Children’s Advil® comes in several flavors, including: Sugar-free Dye-free Berry, Bubble Gum, Grape, Blue Raspberry, Fruit and Dye-Free White Grape flavors.)

Also pictured is Children’s Dimetapp® Multi-Symptom Cold Relief Dye-Free for stuffy and runny nose, while quieting a bothersome cough. It comes in grape flavor that’s dye-free, for children 6 and up. Next, for your child’s cough, there is Children’s Robitussin® Extended-Release 12 Hour Cough Relief to help relieve symptoms day or night. Available in grape or orange flavor, for children ages 4 and up. Please note, certain Children’s Robitussin® products are only suitable for children ages 6 and up.

Of course, ALWAYS remember to read and keep the cartons for complete warnings and dosing information on Pfizer Pediatric products and use as directed. If any questions regarding what product is right for your child, consult with your child’s pediatrician or pharmacist.

Hopefully, your interactions with the school nurse are limited, but show her (or him!) some love and nominate today! Again, this can be done at .

ASUS MeMO Pad 7 LTE Review & GIVEAWAY {$168 value} #ad

This post was sponsored by ASUS and Walmart. All opinions are mine.

For anyone following my little corner of the blog world, you have probably noticed that I have gotten nowhere fast on my ‘dot.com’ endeavor. Let’s just say moving a blog that has been around over 5 years is no easy task! In the meantime, I’ve got bidness to attend to! I have a fantastic giveaway for y’all, and I just couldn’t wait any longer to tell you about it.

If you have kids (or grandkids, or friends and neighbors with kids), I’m sure you know that school is BACK IN SESSION! I think all parents have mixed feelings about this. We are elated to get the kids back-to-school and in their routines again, but it’s also back to hectic mornings, constant chauffeuring, school lunches and the ever dreaded…HOMEWORK. Well, I have something that will definitely help with the homework, and can help us moms (or anyone!) too. There is an app for just about everything these days, and definitely some that help with scheduling, time management, grocery shopping, (or catching up on our favorite TV shows while sitting and waiting for kids to finish practice). That’s where my review of the ® comes in!
It has lots of cool built in features, and tons of available apps through the Google Play Store. Since Chrome is my browser of choice, I love that it’s already pre-loaded and ready to go on the tablet. You can use it to conveniently check email, watch videos, take videos and pictures, read books, play music, browse Pinterest and more! One of my favorite things…SuperNote! You can use it to take quick notes on the go, and you don’t have to worry with typing it in like I do on my phone or my other other tablet…you can write notes with your finger! It’s easy, and much faster for me. Yep, my other tablet (possibly named after a fruit) is not as cool as I once thought. Here are some specifics for the ®:
  • 7” HD tablet with dual front facing speakers and 178-degree wide viewing angle, perfect for watching movies, playing games etc. 
  • Dual cameras: 5MP rear / 2MP front
  • Quad-Core Intel® Atom™ processor 1.3 GHz, gives it the performance to stand out in the 7-inch tablet market. AT&T; 4G LTE network provides speed and reliability at your fingertips
  • Scratch-resistant glass with anti-fingerprint coating
  • 16GB internal storage w/ up 64GB MicroSD Card Support
  • Usage time: up to 10.5 hours Perfect for kids and teenagers
I like the size of the tablet, not too bulky, but big enough that I can easily see it!
As you can see, it’s smaller than a standard composition notebook (approx 7″ x 4″). Another great thing about the ® is that it is much more affordable than other tablets with similar features, and, once your pre-paid time runs out, you have the option of adding it to your existing AT&T; plan (if you have one) or what I like, you can purchase additional pre-paid calling plans at Walmart, so you are always in control of how much you are spending. (The tablet also has WiFi capability.) Learn more by watching this video:
So what do you think? If you are interested in trying the ASUS MeMO Pad 7 LTE® or considering giving it as a gift (Christmas is right around the corner!), you can purchase it at  for $168 AND you can enter my GIVEAWAY!
That’s right, I am giving away one ASUS MeMO Pad 7 LTE® to a Makin’ it Mo’Betta reader! All you need to do is complete one or more entries via the rafflecopter form below.
 
NO PURCHASE OR PAYMENT OF ANY KIND NECESSARY, A PURCHASE OR PAYMENT WILL NOT INCREASE YOUR CHANCES OF WINNING. The Giveaway starts on 9.13.15 and ends on 9.20.15. Open only to legal residents of the 50 U.S./D.C. and 18 years or older as of time of entry. Residents of P.R. are ineligible. Void in P.R. and where prohibited.

Homemade Hummus, Lunchbox ideas & Mason Jar Salads Cookbook Review

I’m a Southern girl, and I’ll admit, we do love our mason jars! But for something that was mainly used for canning (and moonshine!), mason jars are seen everywhere and used for everything nowadays. Just hit up Pinterest and you will see what I mean. What many have come to realize, and we Southern women have known for decades *grin*, is that glass mason jars are great for storing things…especially food because you don’t have to worry about any weird chemicals leaching out. Making salads ahead of time and storing them in the fridge for a weeks worth of healthy lunches/dinners has been all the rage recently, and everyone I’ve seen is stored in a mason jar. So, when given the opportunity to review the cookbook  by Julia Mirabella,  I was more than eager to check it out, as were my Pinterest loving daughters.

First I have to say that the photography in this book is AMAZING. Almost every recipe comes with a gorgeous color photo. The other thing that I loved about the book is it is not just salads in a mason jar, even though everyone in it looks delicious. It gave me ideas on storing other foods, and lunchbox ideas!! This is huge since I have 3 kids who all carry their lunches to school almost everyday. That’s a lot of lunches in a year, and ideas run out quick. So, when my 11 year old saw the Spicy Hummus and vegetables recipe, she asked could she make it and take it for her lunch. Absolutely! I was pleased that we had everything to make it, and she was able to do it almost entirely by herself. I loved the way the homemade hummus and veggies were packaged in a small mason jar. It is such a handy and unique way to carry hummus to school. AND it’s healthy, homemade, and my daughter loved it! I’m thinking I could send my dessert hummus to school for snack the same way….maybe stick apple slices in it?

Spicy Hummus and Vegetables

reprinted with permission from Mason Jar Salads and More
There’s no better midday snack than veggies with hummus — and the great thing about this snack is that you don’t need separate containers for the dip and the vegetables. All you have to do is plant your veggies upright in the dip, close the Mason jar, and voilà, you have something to see you through the afternoon at work.
Makes 4 servings
1 (15-ounce) can chickpeas, rinsed and drained
5 to 6 tablespoons olive oil, as needed
1 clove garlic, roughly chopped
3 tablespoons tahini
1⁄2 teaspoon salt
1⁄2 teaspoon black pepper
6 tablespoons lemon juice
1 teaspoon red pepper flakes
celery and carrots, for dipping
4 half-pint Mason jars
  •  Place the chickpeas in the bowl of a food processor along with 5 tablespoons of the olive oil. Add the garlic, tahini, salt, pepper, lemon juice, and red pepper flakes. Process to blend the ingredients together. If needed to achieve the desired smooth consistency, add another tablespoon of olive oil.
  • Cut the celery and carrots into strips that will fit into the Mason jar with the top closed. Scoop 1⁄2 cup of hummus into the bottom of the jar and then set the vegetable strips upright in the hummus. Seal the jar and refrigerate until ready to use.

This is just one of many recipes that I have bookmarked. Next on my list is a Blueberry Vinaigrette that sounds amazing, along with a Citrus-Soy Vinaigrette, I want to make ahead some salads for my own lunches as well. The Orzo Pasta Salad, the Cobb Salad, and the Asian Greens Salad all sound really good. I also want to get back to my overnight oats, which I always prepare in a mason jar. There are several smoothie recipes in the book as well. So, if you are part of the mason jar (my kids taught me this word) then you should enjoy this cookbook!

   I may be linking up at any of the following – (Monday)  (Tuesday) , ,, (Wednesday) , (Thursday) , (Friday) ,,(Saturday) 

Back to School with Balance Bar – #GIVEAWAY {#sponsored}

My kids went back to school today. Mind. Blown. This has been the fastest summer EVER. I just can’t believe school is back in session, sports have started back up and before you know, BAM, it’ll be Christmas. Let the panic attack begin. Just kidding, no time to panic. It’s time to meal plan, break out the crock pot, makes lists, and get super-mom organized…and lucky for us, is trying to help with that!

Balance Bar, along with parenting expert and Mom blogger Jenny Ingram, from , have some awesome suggestions for surviving ‘back to school’. 
For example: 
·         Keep Smart Snacks within Reach. Back to school isn’t only exhausting for kids. Moms and dads get worn down too so smart snacking is important. Pack a supply of nutritious snacks to have in your purse for when you’re running errands or going from school to practice.  are perfect for keeping your on-the-go snacks organized and always handy. Fill them with grapes, almonds, carrot sticks and  for a healthy snack sure to satisfy both busy moms and kids until dinner!
·         The (digital) calendar is key.To make sure no one misses an activity, homework deadline or playdate, color code each kid in your calendar so you know exactly who is doing what and where and when. The  app – is free and great for organizing your upcoming activities and goes everywhere you do since it’s on your phone.  
·         Pack bags within your bag.  If you’re like me, you have a huge bag. It’s great for storing lots of things, but it can be hard to find anything if you’re not organized. Keeping a mini bag that holds chapstick, hand sanitizer and other items frequently used items in a brightly colored small bag that stands out can help with that. The  can even double as an organizational bag that’s stylish too!
·         Miniature First Aid Kits. It’s helpful to have some first-aid basics in your bag for everyday incidents that are bound to happen. Jenny’s homemade first aid kit includes Band-aids, Neosporin, Kleenex and wipes, and says the wipes are much more effective than napkins at cleaning up whatever messes my kids have.
·         Be prepared for homework. With after-school activities, keep homework supplies in your car and bag so your children can do their work while you’re waiting for soccer/volleyball/etc practice. Keep rulers, pencils, pencil sharpeners, scissors, calculators and a clip board in the car to make sure you’re prepped for any homework assignments.
·         Label everything. With 3 kids, and all the supplies and gear that come with them, labeling is important.  are great for lunchboxes, backpacks, jackets, shoes, sporting equipment and anything else. It also helps avoid lost items in the school coat closet.
·         Pack healthy school lunches efficiently.  Trying to accommodate everyone’s lunch needs is hard. Jenny suggests making their sandwiches and then let them choose 3 snacks for themselves. In your pantry, have mom-approved snacks (like Mixed Berry Balance bar bars) in three drawers and every kid is allowed to choose 1 item from each drawer to add to their lunch.
·         Transitioning summer bedtimes.  Late nights are not going to work once school starts, so gradually transition kids’ sleep schedules. 4-5 days before school starts, move their bedtimes up 10-30 minutes. It’s a slow process but really helps to ensure they’re rested and ready for the first day. Since school has already begun for my kids, it’s important to stick to a nighttime routine and consistent bedtime. I know my kids are going to be worn out by the end of the week!
The Back to School Survival Kit contains these Balance Bare bars. They are made with fruits and nuts, are non-GMO, and Gluten/soy/dairy free. The best part…they taste good! The Sea Salt Caramel Nut tastes almost like a candy bar. It’s my favorite, followed closely by the Sweet and Spicy Nut. I love the hint of spiciness in with the sweet, and it’s a unique flavor idea. However, I also like the Mixed Berry Nut. I’ve been throwing them in my gym bag for after a workout, my daughter has had them as a snack before volleyball, and they are great for curbing my late afternoon ‘Iwanttoeateverything’ phase that hits me around 3:00pm.
The GIVEAWAY consists of your very own Back to School Survival Kit. (The one pictured above is missing a couple of bars. We got hungry before I could take pictures!) The kit contains – 
  • a variety of ,
  • ,
  • the i-pouch,
  • a stylus that is also a functioning pen,
  • and a notepad for all those reminders that will be coming up!

To win, just enter via the rafflecopter form. Shipping only available to US addresses.

I received the above pictured kit to facilitate this post. Both kits and information are provided by Balance Bar. No other compensation was received. All opinions expressed regarding product are my own.

Pancake and Sausage Muffins

Did you know February is National Pancake Month? I couldn’t let the month go by without honoring my beloved pancakes, and what better way to celebrate than with a giveaway! Free stuff is fun, and free food stuff is mo’funner. Not only are we celebrating pancakes, but I have a new recipe that will make your busy mornings easier and tastier. The idea came for these Pancake and Sausage Muffins came from my Speedy Sausage Muffins recipe.

Pancakes and sausage….made portable! I know right?! Awesome. Even better is the fact that these are quick and easy to make with the help of Pancake Mix, and can be made healthier with turkey sausage. My girls loved them, as did I.
If you are not a sausage fan, I feel sure you could use bacon. Or, skip the meat and add in some blueberries (that’s next on my list. Krusteaz also makes a Blueberry Pancake Mix!), or go all cray and add chocolate chips! I’m also thinking you could add syrup right into the mix, which I didn’t do this time, but I think would work out fine…just cut back on the water used. I love versatile recipes!

Pancake and Sausage Muffins

1 lb. sausage (I used turkey sausage)
3 cups Krusteaz Pancake Mix
2 cups water
  • Cook sausage until browned and crumbled. Drain fat if needed. Set aside.
  • Preheat oven to 350 degrees.
  • Whisk pancake mix with water, as directed on box. (Batter will be a little lumpy.)
  • Fold in cooked sausage.
  • Let batter sit for 5-10 minutes.
  • Scoop batter into greased muffin tins, filling about 2/3 full.
  • Bake until done (12-15 mins) – remember they will not brown like muffins….they’re pancakes!

Serve warm with syrup if desired or allow to cool and store in airtight container in fridge. I’m sure they can also be frozen, but ours didn’t last long enough to try it. I got 18 muffins from this recipe.

FOR THE GIVEAWAY-
My friends at Krusteaz will provide one winner with FIVE FREE Product coupons! Coupons are good for the above pictured pancake mix, plus much more! Check out their line of products . I am a fan of their fat free muffin and cornbread mixes too. To enter, complete the options in the Rafflecopter form. Shipping only available to US addresses.

Disclosure: Krusteaz has provided me and will supply the winner with 5 free product coupons. No other compensation was received. All content is my own unless otherwise stated.

Pizza Puffs & Cookbook Review + GIVEAWAY!

One of my favorite food bloggers is Nicole of . I’ve been reading her blog for years now, and she has inspired me to try many new things…like tofu! Yes, my family wasn’t thrilled with that, but I discovered tofu isn’t so bad 🙂 We share the desire to take our favorite foods and lighten them up, and that healthy eating can be delicious! I was very excited for her when she announced she was writing a cookbook, and I was even more excited when I was contacted by the publisher to review the book! Not only that, they are offering a free copy to one of you!!

You know when you start looking over a cookbook, and immediately start bookmarking pages that it’s a good one. One of the first recipes in the book is for Pizza Puffs, and I knew they had to be made immediately. My kids and I love all things pizza!

Pizza Puffs from

3/4 cup flour
1/4 teaspoon baking powder
1/4 teaspoon salt
1/2 teaspoon dried oregano
3/4 cup fat free milk
1 egg, lightly beaten (I used Egg Beaters since I was out of eggs)
4 oz. (1 cup) part-skim mozzarella cheese, shredded
34 slices turkey pepperoni, quartered (I used about 20)
1/2 cup pizza sauce (homemade or store-bought; I used this easy version)
2 tablespoons fresh basil, thinly sliced
Directions:
Preheat oven to 375˚F. Grease a 24-cup mini-muffin pan.
In a large bowl, whisk together flour, baking powder, salt and oregano; whisk in milk and egg. Stir in mozzarella and pepperoni; let stand 10 minutes.
Stir batter, and divide among mini-muffin cups. Bake until puffed and golden, 20-25 minutes.
Warm pizza sauce, then stir in 1 tablespoon basil. Sprinkle puffs with remaining 1 tablespoon basil. (I omitted) Serve puffs with pizza sauce for dipping. (if desired, my kids didn’t want sauce.)
Yield:
24 pizza puffs
Nutrition Information (per pizza puff):
38 calories; 1.4 g fat; 14 mg cholesterol; 123 mg sodium; 3.5 g carbohydrate; 0.1 g fiber; 3.0 g protein (stats per book)
*using the above stats, I calculated these as 1 Weight Watchers Point Plus (per puff)!
These made a great portable meal for the kids the other evening when we they had an insane schedule and had to actually eat dinner between volleyball games. I preferred them at room temp, so they will be great to pack for lunches at school, to have as appetizers, you name it! (When hot they are puffy and airy with melty cheese; when cooled they are more dense like actual pizza bites – they are good both ways!)
The cookbook is like Nicole’s , it has a wide variety of recipes with amazing pictures of each dish. The next on my list to make is the Greek Orzo and the Chocolate Dutch Baby. I’ve also already made Oven Fried Pickles from the book! It’s also the perfect time of year to try the Lightened-Apple Crisp, and the Carrot Cake Pancakes with Cream Cheese Glaze looks absolutely amazing!
So who’s interested in Prevention RD’s Everyday Healthy Cooking Cookbook with 100 Light and Delicious Recipes?! Just enter via the rafflecopter form!

Disclosure – As stated in the post, I was given a copy of the cookbook for review. All opinions are my own.

Easy Cake Mix Cookie Bars & Chinet Bakeware {GIVEAWAY} #sponsored

To commemorate back-to-school for my girls, and entering Kindergarten for my little man, we had to have a little celebration. A par-tay if you will. And nothing says party in the Mo’Betta house better than CHOCOLATE. These bars start with a cake mix, so they are quick and easy, and you can add in anything you have in the baking drawer/cabinet/pantry (yes, I have baking supplies in all those places. #hoarder)

The original recipe was a cookie bar, but I reduced the fat by replacing some of the oil with applesauce, resulting in a more cake-like brownie texture, which is why I am just calling them Cake Mix Bars. With chocolate chunks, cookies and cream pieces, and M & M candies…they aren’t exactly low-fat…but hey, I tried. Sort of.
Not only were these bars quick and easy to make…there was very little clean up too. (Always an A+ in my book!) I used the new Bakeware (9×11 pictured here) and Chinet dessert plates for serving. Yes, you read that right, Chinet now has ! Disposable pans that come in a variety of sizes, making any situation where you need to carry food somewhere, (or just needing easy clean-up!) very convenient! Each pan also comes with a lid, so transporting is so easy, and you don’t have to worry about getting your pan back! These cake bars made for super happy kids, and easy clean-up made for a happy mom. It’s a win folks.
And speaking of winning…the nice people over at Chinet would love for a Makin’ it Mo’Betta reader to win a set of Chinet Bakeware to try out for themselves! One winner will receive a set of bakeware in each size. More info after the recipe…

Easy Cake Mix Cookie Bars

  • 1 box cake mix (I used Dark Chocolate)
  • 1 small box Jello instant pudding (I used Sugar Free/Fat Free chocolate)
  • 1/4 cup water
  • 1/2 cup applesauce*
  • 1/4 cup canola oil*
  • 2 eggs (I used Egg Beaters)
  • 1/2 cup cookies n’cream and chocolate chunks (that’s what I had on hand)
  • 1/2 cup M and M’s
*The original recipe calls for 3/4 cup oil. I substituted a half cup of applesauce. This changes the texture, so if you want a dense cookie bar, use more than 1/4 cup oil. My kids didn’t mind 🙂
  1. Preheat oven to 350 degrees F.
  2. Spray a 9×13 inch baking pan with cooking spray. Set aside.
  3. In a large bowl, mix together the cake mix, pudding, water, applesauce (if using), oil and eggs or Egg Beaters.
  4. Fold in your add-ins
  5. Pour batter into prepared pan, spread evenly (my batter was pretty thick).
  6. Bake for approx 20 minutes or until done around edges, but slightly soft in middle (if you use different ingredients, they may need to cook a little longer)
  7. Let cool. Top with whipped topping and sprinkles if desired!
Recipe adapted from
This was a fun and easy treat to celebrate back-to-school! Now, about that giveaway…
The winner will receive a set of Chinet Bakeware including one of each size:
8×8 Square Pan
7×11 Large Oval Pan
9×11 Rectangle Pan
7.25×9 Small Oval Pan
 
Please enter via the Rafflecopter form. If you are viewing this in an email, you will need to click over the actual post. Shipping only available within the US.

I received a complimentary set of bakeware and stipend for supplies from Chinet. All opinions are my own. This is part one of a 4 part series featuring Chinet, so if you don’t win this one, stayed tuned!

Brownie Graduation Hats

For Mr. Three’s pre-school graduation party last week, I made little graduation hats. (I can’t believe my baby is going to Kindergarten in the Fall!)
 (You may have seen this pic on already.)  I got the idea from Pinterest (of course), but most used a Reese Cup as the base.  Mine needed to be peanut free, since my son and another classmate are allergic.  So, I decided on brownies, baked in a mini muffin pan. (You could buy pre-made brownie bites making these a quick, no-bake treat!)
 I thought they turned out pretty cute for my first attempt, and the kids & parents alike enjoyed them. {Yes, I was *that* mom who brought in something cutesy off Pinterest. But hey, sometimes I’m that “crap! I forgot to buy something for the party, let me grab some Little Debbie snacks” mom too. It’s called balance. Can’t be on top of my game all the time. lol}
Since these were for preschoolers, the mini brownies made the perfect size snack!
Brownie Graduation Hats
 
1 box brownie mix, plus ingredients on box
1 package chocolate covered graham cookies
candy for ‘tassels’*
mini M and M candies
melted chocolate for ‘gluing’ everything together
  • Mix brownies according to directions on package (or try this egg free, lower fat version!).
  • Bake brownies in a mini muffin pan until done (they will not take as long to bake as directed on package since they are minis. Do I really need to point that out? probably not)
  • Once cool, carefully cut rounded tops off brownies so they will sit flat (if needed)
  • Flip brownies over, so the widest side is down.
  • Use some melted chocolate to attach a graham cookie to the now upside down brownie.
  • Use more melted chocolate to attach candy tassels to top of cookie, and the mini M candy on top of tassel.
*The candy that I used for the tassels was some rope candy I had never seen before (and don’t remember the name of). It is similar to the pull-apart Twizzlers in shape. The problem I had with this candy is that it was kind of hard and round, and it was a little difficult to get the round rope pieces to sit on top of the cookie, and they were a little too big. I ended up cutting each rope piece in half (vertically), and then cut them to the desired length.  My recommendation, and what I will do in the future, is use something that is flat…like a fruit roll up, or maybe a flattened Tootsie roll? And cut it into strips. I think that would be much easier to work with.
Other tips: You could use cookie icing to “glue” your pieces together, b/c it hardens pretty quickly and comes in a handy little squeezable pouch. The only color I had on hand was red…so I ended up using melted chocolate. You don’t need that much…I might have used 1/4 cup?
I may be linking up at any of these places – 

(Monday) , , , , , , , , , ,  (Tuesday) , , , ,,, , ,  (Wednesday) , , , , , , , Cherished Handmade Treasures,   (Thursday)  ,, , , ,  (Friday) ,  , , , , ,, , , ,, , , , , (Saturday) ,  ,  (Sunday) 

 This post was featured at , , , , , and ! Thank you ladies!
   

Teacher Gift Idea

Yes, this is another teacher gift idea involving cookies!  My kids gave these out during Teacher Appreciation Week, but I forgot to post them and they would be good for the end of the year too.

We had extra Girl Scout cookies, but you could use any cookies you like.
The {free} printable is available from .  I heart free printables.
Need a homemade cookie recipe? These are pretty simple, yet tasty….
Special Diet? Try one of these…
Homemade ‘Thin Mints’ (low carb & gluten free)
LAST WEEK OF SCHOOL HERE!!! Wooo hooo! (let’s see if I’m cheering when the kids have been out about a week!)

White Chocolate, Cranberry & Pistachio Cookies

Preschool ended this week for Mr. Three and we wanted to give a little something to his teachers.  He really loved his teacher and classmates…it is so sweet!  As always, when thinking of a little gift, food comes to mind.  I’ve especially been on a cookie kick recently. (Why can’t I get on a lunges kick, or jump rope kick…why’s it always food?!)

had a perfect guess to my little sneak peak photo yesterday!

White Chocolate, Cranberry & Pistachio Cookies

adapted from my Tropical Trail Mix Cookies

1/2 cup (1 stick) softened butter or margarine *I used Smart Balance 50/50
1/2 cup granulated sugar
1/4 cup firmly packed light brown sugar
1 large egg
1-1/4 cups all purpose flour
1/2 teaspoon baking soda
1 cup white chocolate chips
1 cup dried cranberries 
1 cup chopped pistachios *I used a 1/2 c. pistachios and 1/2 c. almonds b/c that’s what I had on hand

Preheat oven to 350 F.  In a bowl, beat butter and sugars until light and fluffy; add egg.  Combine flour and baking soda; blend into creamed mixture.  Stir in chips, fruit and nuts. Drop rounded tablespoonsful of dough (1-1/2 inch balls), about 2 inches apart, on silicone mat lined or greased cookie sheet. Bake 13-15 minutes.  Cool 2-3 minutes on cookie sheets before transferring to wire racks to cool. Store in tightly covered container.  Makes about 32 cookies* 
*Depends on the size of your cookies and how much dough you eat!

We took the cookies and put them in little tins that I picked up from Target (in the dollar bins). If you are thinking this looks familiar, it’s because it is….I did almost the same thing for Teacher Appreciation last year, except I made Tropical Trail Mix Cookies.  Yum.

This cute little printable came from , and I just pasted it onto some decorative paper.

 I wrote a little note on the back and my son signed his name all by himself! 

I thought these cookies were really good.  (Because you know I had to try them several times before I gave them away. Obviously.)  I’m not a huge fan of white chocolate, but it pairs very well with the cranberries and pistachios/almonds.  Definitely a combo I’ll be making again!

Don’t forget to go enter my Rafflecopter GIVEAWAY for 2 mega boxes of Cheerios!

I’m linking up today with , , , , , ; , , , ,