Pumpkin Mesh Wreath

First, YAY!! This is my first “official” post on my new site! And WOW…what a pain in the rumpkus (is that a word?) the Blogger to WordPress move has been. THANK GOODNESS for . Without them, this site would still be sitting here blank I’m afraid. I will spare you all of the details, but it has definitely been one thing after another. Oh, and did I mention that I happened to have surgery AND my computer crashed during all of this as well? Ha! Fun times. Not! Moving on…

Pumpkin Wreath

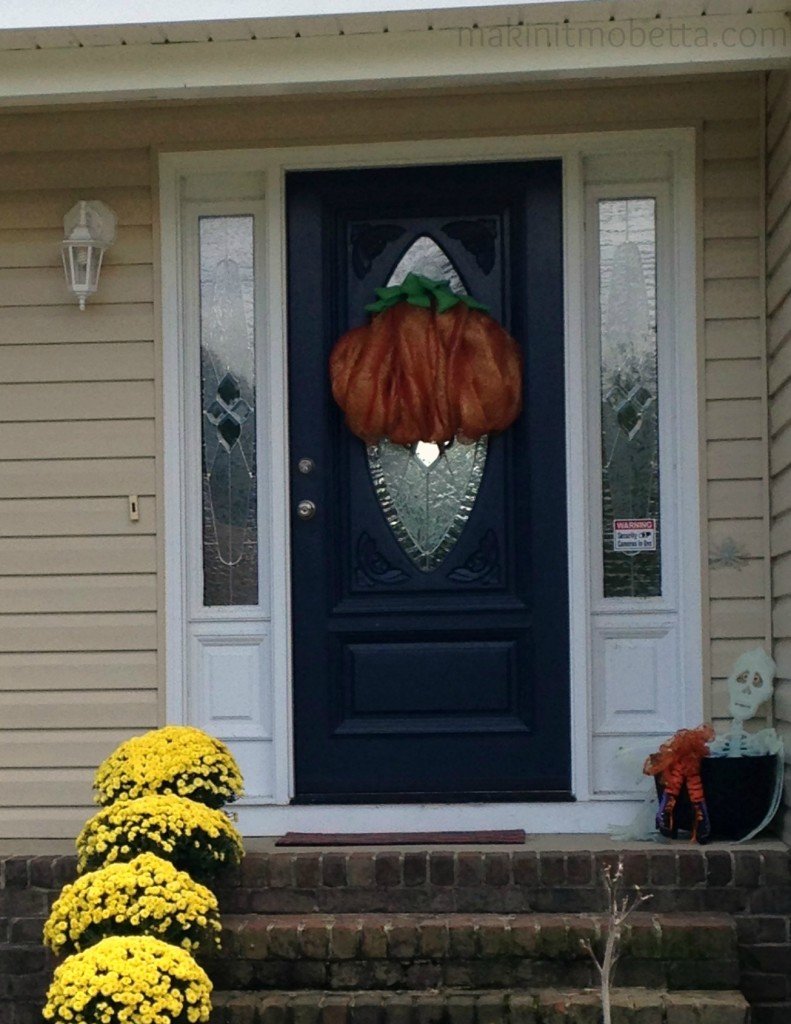
This Pumpkin Mesh Wreath is festive, (I think it’s cute), cheap, and super easy to make. I don’t do a lot of Fall decorating, but I usually have a Fall wreath, a couple of garden flags, mums, and pumpkins. Our weather has been so wacky, that my mums are already mostly dead (or lack of water could have caused that. Go figure.)

Since I’m a visual person, I’m going to show each step in pictures. I will explain the best I can, but it’s really easy.

Wreath Supplies

Step One: Supplies

  • One wire wreath (I bought mine at Walmart, I think it was $5)
  • Pipe cleaners (ideally in orange, but I already had these from another wreath. $1 from Dollar Tree)
  • long roll of mesh ribbon (This was from Walmart or Sam’s Club, also around $5)
  • ribbon for the top of pumpkin (I used green burlap – $1 from Dollar Tree. See Step 3)

How to begin

Step Two: Making Body of Wreath

  • Place six pipe cleaners at the top and six at the bottom of  the wreath form. If you look at it as a clock, place the first one at 10:00, the last one at 2:00, and put the other four randomly in between for the top. (You can adjust to exactly where you need them as you go along.) The bottom ones can go between 4 and 8:00.
  • Start at the top “10:00” pipe cleaner, attaching the end of your wire mesh. Pull the mesh down and attach at 8:00 as pictured above (is this clock reference getting old, or is it just me?!).

Body of wreath

  • Repeat the up and down pattern with the mesh until the wire wreath form is covered. If you want it fuller/thicker, just add more pipe cleaners to hold in place. Once the wire is covered, you can adjust/fluff wreath to get the look you want.

Final step

Step 3: ‘Stem’ of Pumpkin

  • I used the above pictured burlap ribbon. However, I think a wired ribbon would look better, and give the “stem” some shape and hold. The burlap kind of just lays there.
  • There is no technique for the stem…I just attached it to the top in and up and down pattern, using the ends of the pipe cleaners that were already in place holding the mesh.

And that’s it! I spent $12 and technically I already had the wreath form and pipe cleaners. You can remove the mesh and add something different for Christmas, or you can save the pumpkin to use next year. It’s nothing fancy, and I may tweak it here or there, but overall, I think it’s cute.

I never thought I would like the mesh wreaths, but somehow they grew on me. How about you? What kind of decorations do you have for Fall? Any Blogger to WordPress nightmares you’d like to share?!

This post has been featured at:


I may be linking up at any of the following – (Monday) , , , ,  (Tuesday) ,, ,  (Wednesday) , , ,  (Thursday) ,  (Friday) , , , , ,  
Candy Bouquet {Dollar Tree DIY}

Since I’ve been MIA from the blog, I wanted to give you all a special gift. Like a bouquet of flowers maybe? Flowers are nice….but a candy bouquet is even better!
This is something I very quickly and easily put together from supplies found at my local Dollar Tree store. It would make a great “little something extra” for that special teacher (end-of-the-year is near!), graduations, birthdays or let the kids put one together for Father’s Day (June 21st!)
This one has a ‘base’ made of my oldest daughter’s favorite candy…Swedish Fish, but any “movie theater” box of candies will work. Then I added various candy, suckers, fun straws, and a balloon in the center. On the balloon, I put her name, using stick-on letters and her jersey # since this was for a sports thing (8th grade recognition night for Volleyball). The Skittles and gum packets were taped to lollipop sticks.
To make…you need 4 boxes of candy, the same size. Then you need one foam block, usually found with floral supplies, like this one…
Photo from
It doesn’t really matter what size, as long as the boxes of candy fit around it. You can also trim the blocks down if too tall.
  • Place the boxes of candy around the foam block, using duct tape, packaging tape, or glue to keep the boxes stable and adhered to block. Next, add your candy. If using suckers/lollipops, stick them evenly into and around the foam block, like you would flowers! Then, fill in spaces with other candy (attached to lollipop/cake pop sticks) or use straws or anything else you would like. Get creative! Now you have your own bouquet to share…
At least she was supposed to share…
I may be linking up at any of the following – (Monday)  (Tuesday) , , (Wednesday)  (Thursday)  (Friday) ,, ,

Graduation Oreo Truffles

Time for this mommy to grab the Kleenex. My baby is graduating Kindergarten! I know that when my oldest graduates high school, I will need an entire box. Time is just flying by much too fast. Of course, I say that all the time (but it’s true!). I was also emotional last year when my baby graduated preschool but I think it has a lot to do with the fact that he is the baby and this will be the last of the “firsts”, if that makes sense. Thankfully/joyfully, I have a in a few months and I just can’t wait *insert big cheesy grin*.

Not only is my son graduating Kindergarten, but my middle child is ‘graduating’ to middle school. So, in honor of their accomplishments, I wanted a special dessert. Because I like to celebrate every special occasion with dessert. (Which is why I have to spend a lot of time at the gym.)

Last year I made these Brownie Graduation Hats

I was planning on making them again, but I got attacked by the Oreo bug. You know the one…the one that attacks your brain with constant ‘EAT OREOS, YOU WANT OREOS’…and the only cure is to eat the damn Oreos. It’s a nasty little bug.

So…I decided to make Oreo Truffles, with the same concept of the brownie graduation hats, with the chocolate covered graham cookies as the top of the ‘hat’. I decided to use melted white chocolate for the tassels.

(This nifty made it SO easy!)
You can also personalize them with names, year, etc.

I thought they turned out pretty delicious. I mean cute. You can serve them on a stick, like cake pops…great for little hands –

Or you can serve them on a platter –

If you can find candy in the graduate’s school colors, it makes a cute presentation I think. You could also place them on top of cupcakes!

 The best part, these are very easy to make. The truffle itself is only 2 ingredients, and I throw everything into a food processor and blend it up, then dip in chocolate. Now that I’ve discovered , it’s so much easier to make chocolate covered treats, making things like this much more fun for the kids and I.

Graduation Oreo Truffles

1 package Oreos (I used regular, but could use different flavors to change it up)
4 oz. (1/2 package) cream cheese

8 oz chocolate, melted (I used )
1/2 package of chocolate covered graham cookies
white chocolate for decorating (optional) I used

Add package of Oreos to bowl of food processor. Pulse a few times to chop into pieces.
Add cream cheese to processor. Blend Oreos and cream cheese until well blended.
Mixture will be thick (like a cookie dough).
Roll into 1 to 1 1/2 inch balls and place on waxed paper lined cookie sheet.
Chill in freezer while preparing chocolate.
Melt chocolate per directions (microwave or double broiler method).
Dip chilled oreo truffles into melted chocolate. Place on wax paper. Top with chocolate covered graham cookie. Allow chocolate to set.
Decorate tops with white chocolate drizzle or as desired.

Having these little gems will make Kindergarten graduation a little easier 🙂

Chocoley Chocolate sent me samples to try. No other compensation was received. All opinions are my own. 

I may be linking up at any of the following – (Monday)  (Tuesday) , ,,, (Wednesday) , (Thursday) , (Friday) ,,,(Saturday) 

Easy crafts for gift giving

Somehow Christmas Day came and went in a blurrrrr. Wow! I can’t believe it is over! But, I figured I would go ahead and post these little crafts/ideas anyway. Just a couple of projects we had going on…

Scarf with ribbon
A couple of gifts my 10 y/o gave to her besties. All you need is a scarf (great deals can be found at Old Navy and Wal-Mart), then embellish them with your choice of ribbon. I sewed mine, but you could probably use the iron on adhesive too. I don’t know how well that would hold up with washing, etc. I’m not much of a seamstress, so I don’t know how well mine will hold up either! However, I thought the end result was pretty cute. (zebra print is still the thang with my girls.)
Candy Sleighs
My girls made these candy sleighs for some friends and teachers. Forgive the horrible photos, the lighting is terrible in my house at night, and these were taken with my cell phone. Always in a hurry around here!
My girls used the hot glue gun to hold them together, and no, my daughter does not have a tattoo. Why does she insist on writing on herself?!
We also tied some red curling ribbon around each one, but I didn’t get a picture of that. I think these turned out really cute! All you need is 2 candy canes for the bottom, a Kit Kat bar, some Hershey’s miniatures, and we used Hershey’s Peppermint Bark Bells for the top. Who doesn’t like a little chocolate for Christmas?!
Now, could someone send over some cleaning elves? My house is a wreck!
I hope you and yours are enjoying great family time and have a Happy New Year!
Time to think about NYEve appies!

Happy Thanksgiving & Acorn Cookies

I hope everyone who celebrates Thanksgiving has had a wonderful day full of food and family. I enjoyed both! It probably wasn’t necessary to try all the desserts, but I felt it was my duty as a food blogger 😉

You may have seen these Acorn Cookies on or ….

“Acorn” Cookies

  • Mini Nilla Wafer Cookies
  • Hershey Kisses
  • Mini Chocolate Chips
  • chocolate wafers, melted
Melt chocolate wafers, use the melted chocolate to “glue” the Hershey Kiss to the bottom of a mini wafer. Then use a small amount of melted chocolate to adhere the mini chocolate chip on top of the mini wafer. End result – cute little acorn cookies!
We used Caramel Hershey Kisses and they were tasty little treats. We also made Pumpkin Spice Rice Krispie Treats and added them with the acorn cookies to treat bags for the kids’ teachers. The treat bag tags were found at (free printable!). I have also discovered that you can cut the butter in the cereal treats back to 3 T., but it’s best not to cut it back to 2 unless you want really crispy Krispie Treats! Just a little FYI. Sorry teachers!
This recipe is linked up with

Brownie Graduation Hats

For Mr. Three’s pre-school graduation party last week, I made little graduation hats. (I can’t believe my baby is going to Kindergarten in the Fall!)
 (You may have seen this pic on already.)  I got the idea from Pinterest (of course), but most used a Reese Cup as the base.  Mine needed to be peanut free, since my son and another classmate are allergic.  So, I decided on brownies, baked in a mini muffin pan. (You could buy pre-made brownie bites making these a quick, no-bake treat!)
 I thought they turned out pretty cute for my first attempt, and the kids & parents alike enjoyed them. {Yes, I was *that* mom who brought in something cutesy off Pinterest. But hey, sometimes I’m that “crap! I forgot to buy something for the party, let me grab some Little Debbie snacks” mom too. It’s called balance. Can’t be on top of my game all the time. lol}
Since these were for preschoolers, the mini brownies made the perfect size snack!
Brownie Graduation Hats
 
1 box brownie mix, plus ingredients on box
1 package chocolate covered graham cookies
candy for ‘tassels’*
mini M and M candies
melted chocolate for ‘gluing’ everything together
  • Mix brownies according to directions on package (or try this egg free, lower fat version!).
  • Bake brownies in a mini muffin pan until done (they will not take as long to bake as directed on package since they are minis. Do I really need to point that out? probably not)
  • Once cool, carefully cut rounded tops off brownies so they will sit flat (if needed)
  • Flip brownies over, so the widest side is down.
  • Use some melted chocolate to attach a graham cookie to the now upside down brownie.
  • Use more melted chocolate to attach candy tassels to top of cookie, and the mini M candy on top of tassel.
*The candy that I used for the tassels was some rope candy I had never seen before (and don’t remember the name of). It is similar to the pull-apart Twizzlers in shape. The problem I had with this candy is that it was kind of hard and round, and it was a little difficult to get the round rope pieces to sit on top of the cookie, and they were a little too big. I ended up cutting each rope piece in half (vertically), and then cut them to the desired length.  My recommendation, and what I will do in the future, is use something that is flat…like a fruit roll up, or maybe a flattened Tootsie roll? And cut it into strips. I think that would be much easier to work with.
Other tips: You could use cookie icing to “glue” your pieces together, b/c it hardens pretty quickly and comes in a handy little squeezable pouch. The only color I had on hand was red…so I ended up using melted chocolate. You don’t need that much…I might have used 1/4 cup?
I may be linking up at any of these places – 

(Monday) , , , , , , , , , ,  (Tuesday) , , , ,,, , ,  (Wednesday) , , , , , , , Cherished Handmade Treasures,   (Thursday)  ,, , , ,  (Friday) ,  , , , , ,, , , ,, , , , , (Saturday) ,  ,  (Sunday) 

 This post was featured at , , , , , and ! Thank you ladies!
   

Homemade Caramel Apples

Caramel Apples, or in our case, hurricane preparation. The weather has been super yucky…days of wind and rain, so to help entertain the kids, and have something yummy to eat, we decided to make our annual caramel apples.  The kids always love doing this!
My 4 y/o was so funny, he meticulously placed individual sprinkles and M&M’s on his apple!  While the rest of us rolled ours in pretty much everything available. 
We used crushed Whoppers, M&M’s, sprinkles, pretzels, and chopped dark chocolate.
And then, of course, even better than decorating the apples…is eating them!
The caramel recipe is SO easy, and has 3 ingredients!

Caramel Apple Recipe 
from


6 – 8 small apples, unwaxed, cold   (*I used 4 large Granny Smiths, and have a little caramel leftover)

 1 cup heavy cream

1/2 teaspoon sea salt

1 cup honey

Special equipment: candy thermometer, and lollipop sticks

Line a baking sheet with parchment/wax paper.
Push a lollipop or popsicle stick deep into each apple (through the stem.)
Fill a large bowl 1/2 full with ice water and set aside.
In a medium, thick-bottomed saucepan heat the cream and salt until tiny bubbles start forming where the milk touches the pan – just before a simmer.

Stir in the honey. Bring the mixture to a boil. Reduce the heat to an active simmer and cook, stirring constantly with a wooden spoon, for about 15-20 minutes minutes or until the mixture reaches about 255-260F degrees on your candy thermometer.
To stop the caramel from cooking, carefully set the bottom of the saucepan in the bowl of cold water you prepared earlier – taking special care not to get any of the water in the caramel mixture. Stir until caramel begins to thicken up – you want the caramel to be thin enough that it will easily coat your apples, but not so thin that it will run right off. If the caramel thickens too much simply put the pot back over the burner for 10 seconds or so to heat it up a bit.

Place each apple on the wax/parchment lined baking sheets and allow the caramel to cool, but get your decorations on before it sets.

 
As far as Hurricane Sandy, we were fortunate where I am in eastern NC. Some localized flooding, but nothing unusual. I hope everyone  is safe wherever you are!
 
I’m linking up at ,,,,

Pinterest Inspired Craft Projects

Yep, Mo’Betta’s been craftin’.  Pinterest not only inspires me to cook (and eat!), but to also get my craft on.  With a new Hobby Lobby in town…well, it’s a pinner’s paradise.  And if you are wondering what the fudge is Hobby Lobby….it’s like Michaels, a large craft store.  {That sells Christmas ornaments year round!!!  I looove Christmas ornaments.}

 I have seen several “rope” projects, like one, and decided to make one for my sister for her b-day….
I decided my 1st project should be something small, so I did a single glass vase.  It is so simple! Just take rope, (I started at the bottom – don’t know if it matters) and wrap it around whatever you are covering, in this case, a vase.  Use hot glue to hold your rope to the vase.  I glued it where I started and then every couple wraps I would add some glue.  Then glue at the top where your rope ends.  Hopefully keeping it nice and secure.  My sister hasn’t mentioned that it has fallen apart yet, so maybe all is well.
My next project was inspired by the many wreaths I’ve seen on Pinterest, like one.   This is a work in progress.  I have also discovered Mod Podge.  Watch out people!
I bought a large pre-cut letter from Hobby Lobby, scrapbook paper, & Mod Podge (which I will be checking out making my own after I use the bottle I have now!)
I covered my letter with the scrapbook paper (adhering and sealing with the Mod Podge).
I plan on attaching it to a rope wreath something like this one…
photo from
So what has Pinterest inspired y’all to do?
I wish I could get inspired to do all these exercises I keep pinning!
I’m linking up this week with , , , , , , ,

White Chocolate, Cranberry & Pistachio Cookies

Preschool ended this week for Mr. Three and we wanted to give a little something to his teachers.  He really loved his teacher and classmates…it is so sweet!  As always, when thinking of a little gift, food comes to mind.  I’ve especially been on a cookie kick recently. (Why can’t I get on a lunges kick, or jump rope kick…why’s it always food?!)

had a perfect guess to my little sneak peak photo yesterday!

White Chocolate, Cranberry & Pistachio Cookies

adapted from my Tropical Trail Mix Cookies

1/2 cup (1 stick) softened butter or margarine *I used Smart Balance 50/50
1/2 cup granulated sugar
1/4 cup firmly packed light brown sugar
1 large egg
1-1/4 cups all purpose flour
1/2 teaspoon baking soda
1 cup white chocolate chips
1 cup dried cranberries 
1 cup chopped pistachios *I used a 1/2 c. pistachios and 1/2 c. almonds b/c that’s what I had on hand

Preheat oven to 350 F.  In a bowl, beat butter and sugars until light and fluffy; add egg.  Combine flour and baking soda; blend into creamed mixture.  Stir in chips, fruit and nuts. Drop rounded tablespoonsful of dough (1-1/2 inch balls), about 2 inches apart, on silicone mat lined or greased cookie sheet. Bake 13-15 minutes.  Cool 2-3 minutes on cookie sheets before transferring to wire racks to cool. Store in tightly covered container.  Makes about 32 cookies* 
*Depends on the size of your cookies and how much dough you eat!

We took the cookies and put them in little tins that I picked up from Target (in the dollar bins). If you are thinking this looks familiar, it’s because it is….I did almost the same thing for Teacher Appreciation last year, except I made Tropical Trail Mix Cookies.  Yum.

This cute little printable came from , and I just pasted it onto some decorative paper.

 I wrote a little note on the back and my son signed his name all by himself! 

I thought these cookies were really good.  (Because you know I had to try them several times before I gave them away. Obviously.)  I’m not a huge fan of white chocolate, but it pairs very well with the cranberries and pistachios/almonds.  Definitely a combo I’ll be making again!

Don’t forget to go enter my Rafflecopter GIVEAWAY for 2 mega boxes of Cheerios!

I’m linking up today with , , , , , ; , , , ,